FSX 2020 User Manual
-
Activation
-
FSX Activation
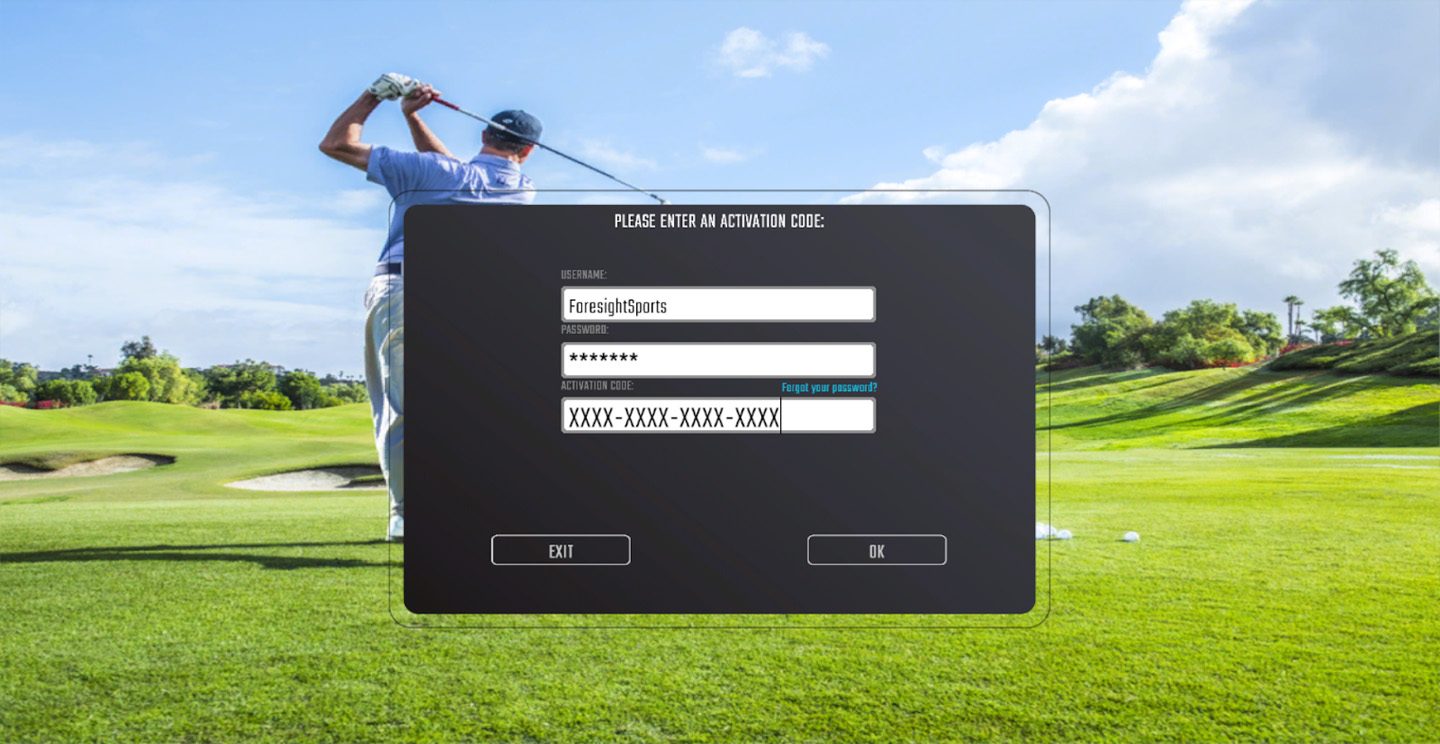
On the initial launch of FSX 2020, you will be prompted to enter the username and password for the MyPerformance account you would like to assign to FSX 2020.
Please Note: This should be the same account that any additional course purchases are made with. If you do not have a MyPerformance account, please visit performance.foresightsports.com/register.
You will also be required to enter the 16-digit activation code provided to you at purchase. Be sure not to include additional characters or spaces. The activation code is not case sensitive.
Please Note: Internet connection is required when using FSX 2020.
-
Golf Course Activation
Golf courses can be activated through any of the three game modes (Play, Improve, Compete). All golf courses that have not been activated will show a small lock icon in the upper left and Not Activated text under the course name. The course will activate once it is selected by the user.
If a golf course is shown as Not Purchased, the FSX Live account associated with FSX 2020 has no available licenses for the course. Additional licenses can be purchased by contacting your Foresight Sports sales representative.
A single course license cannot be used to activate a course on multiple computers. If you would like to transfer a license to a different computer running FSX 2020, you must first deactivate the license on the original computer where it was used.
This can be done by selecting the Deactivate icon located at the top of the Select Course screen while the course is selected.
To activate all purchased courses at once, select Activate All in the Golf Course Activation screen.
Please Note: FSX 2020 can only use course licenses associated with the My Performance account entered during FSX 2020 activation.
-
-
Getting Started
-
Launching FSX 2020
.png)
Launch FSX 2020 from the icon on your desktop or the directory where the program is installed.
-
Connecting A Device
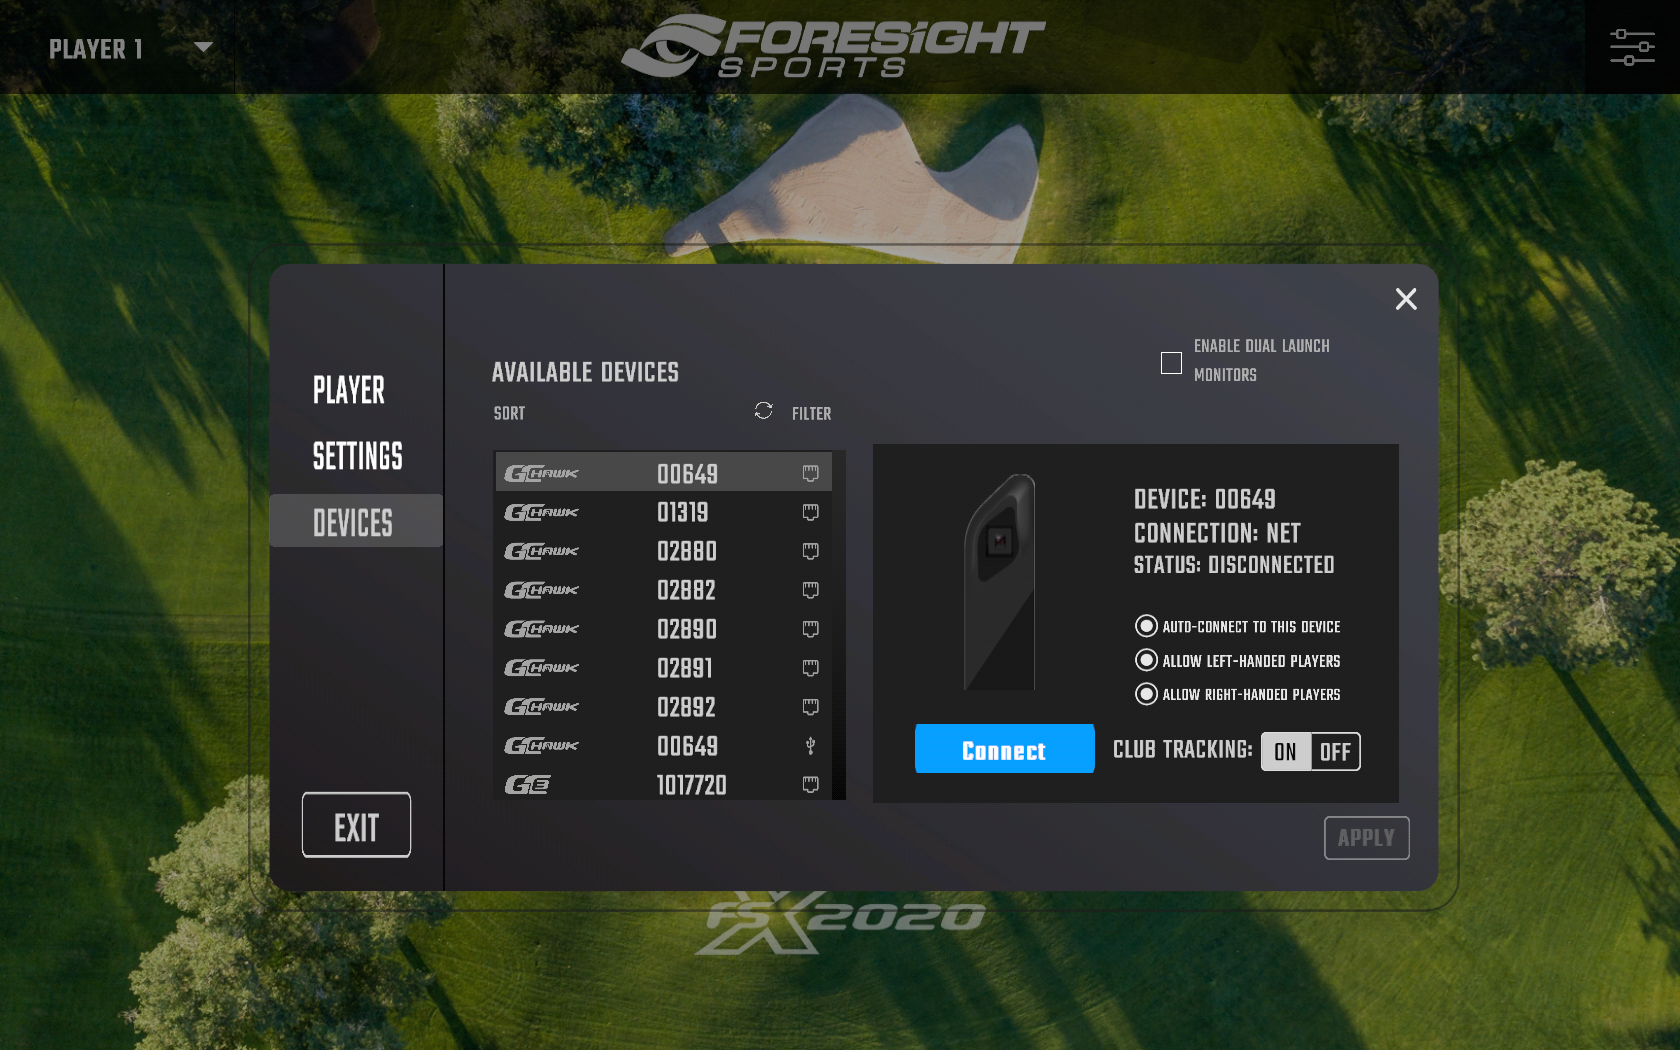
Users must connect their device to FSX 2020 to begin playing. Please click the player dashboard icon (top right) and connect a device under the ‘devices’ tab.
If you have a GCHawk, and wish to Enable your purchased Club Feature Addon, you will do that at this stage as well:
-
Connecting A Swing Camera
To connect your Foresight Swing camera, follow the instructions below:
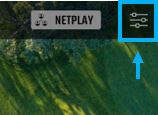
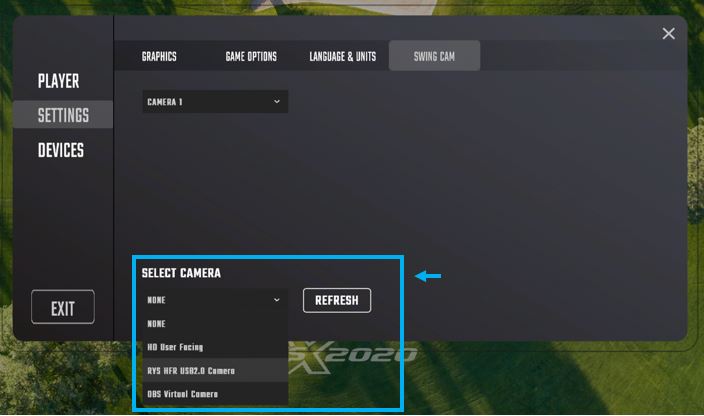
1. Open the FSX 2020 SETTINGS window:
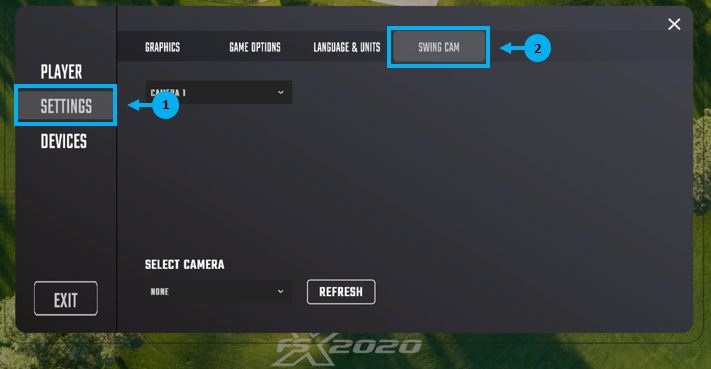
2. Select the SETTING option (1), then the SWING CAMERA tab (2).
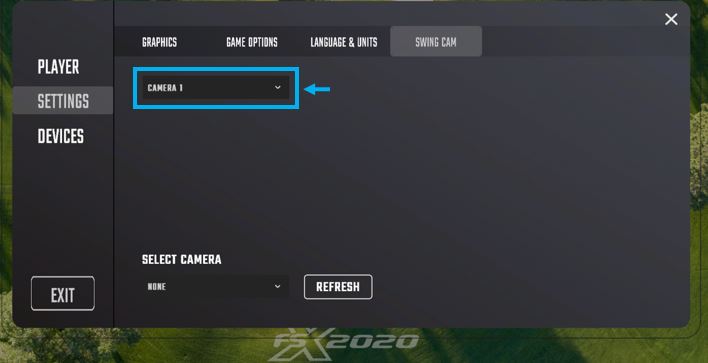
3. The first drop down indicates the number of cameras in relationship to position. Camera Position 1, Camera Position 2, and so forth.
4. The second drop down indicated the camera that will be assigned to that position. Select the REFRESH button to force the software to check for any connected cameras.
NOTICE: Select a new Camera Position from the First Drop Down, and assign remaining cameras to add more than one Camera to your FSX 2020 Software.
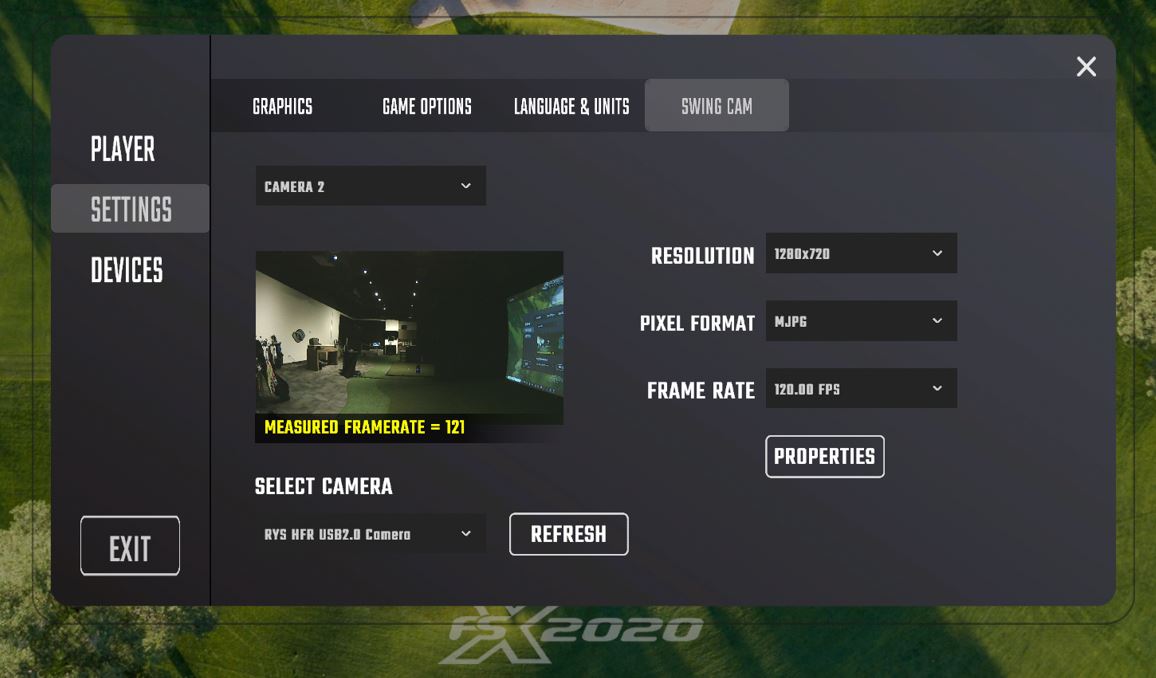
5. Once the Camera is selected you will be able to review the basic setup, adjust the cameras physical focus, and review current frame rate:
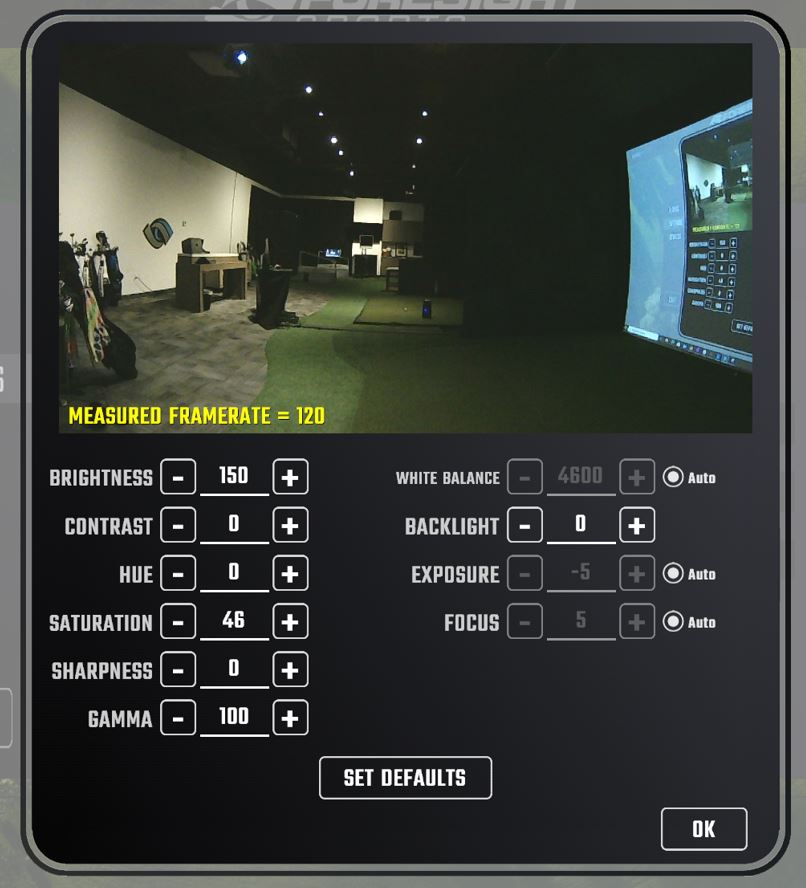
6. Select the PROPERTIES button to adjust camera settings, such as:
- Brightness
- Contrast
- Hue
- Saturation
- Sharpness
- Gamma
- White Balance
- Backlight
- Exposure
- Focus
NOTICE: Increasing Digital Brightness will prolong Lens Timing, which will decrease frame rate. It is recommended to increase lighting within your environment if you wish to not decrease frame rate.
7. When you are satisfied, select the OK button and then return to the main menu.
-
-
Play
-
Starting a new round
To start a new round, select the Play icon from the main menu. Choose between starting a new game, Footgolf, selecting the last game played, browsing your saved games or a random game. To proceed with default settings at any time during round setup, select the Start button in the bottom left hand corner of the screen.
-
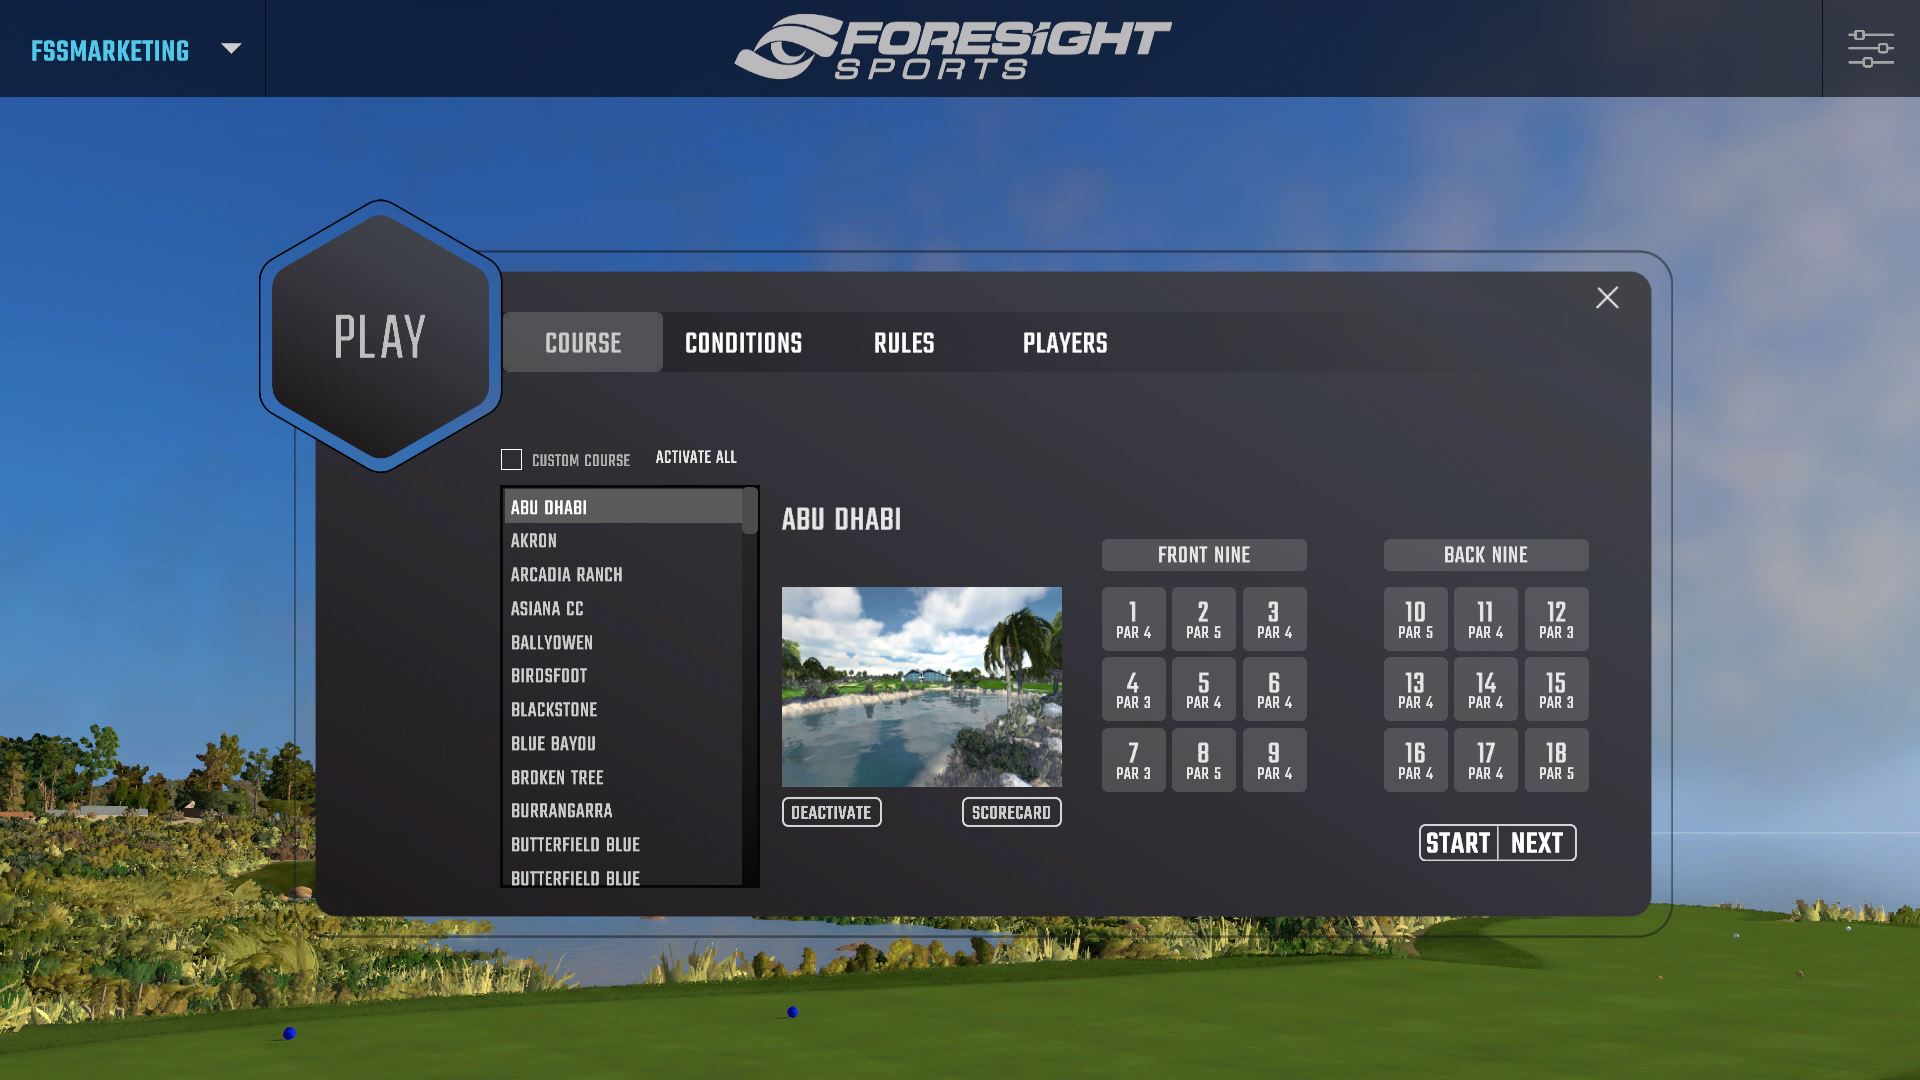
Select a Course
Select the course and holes that you wish to play. Selected holes are highlighted in grey. Players can view the scorecard of their chosen course by selecting the Scorecard icon. Selecting the Custom course icon allows players to create their own custom course with holes from individual courses in FSX 2020.
-
Select Course Conditions
Option 1: Real-Time Weather
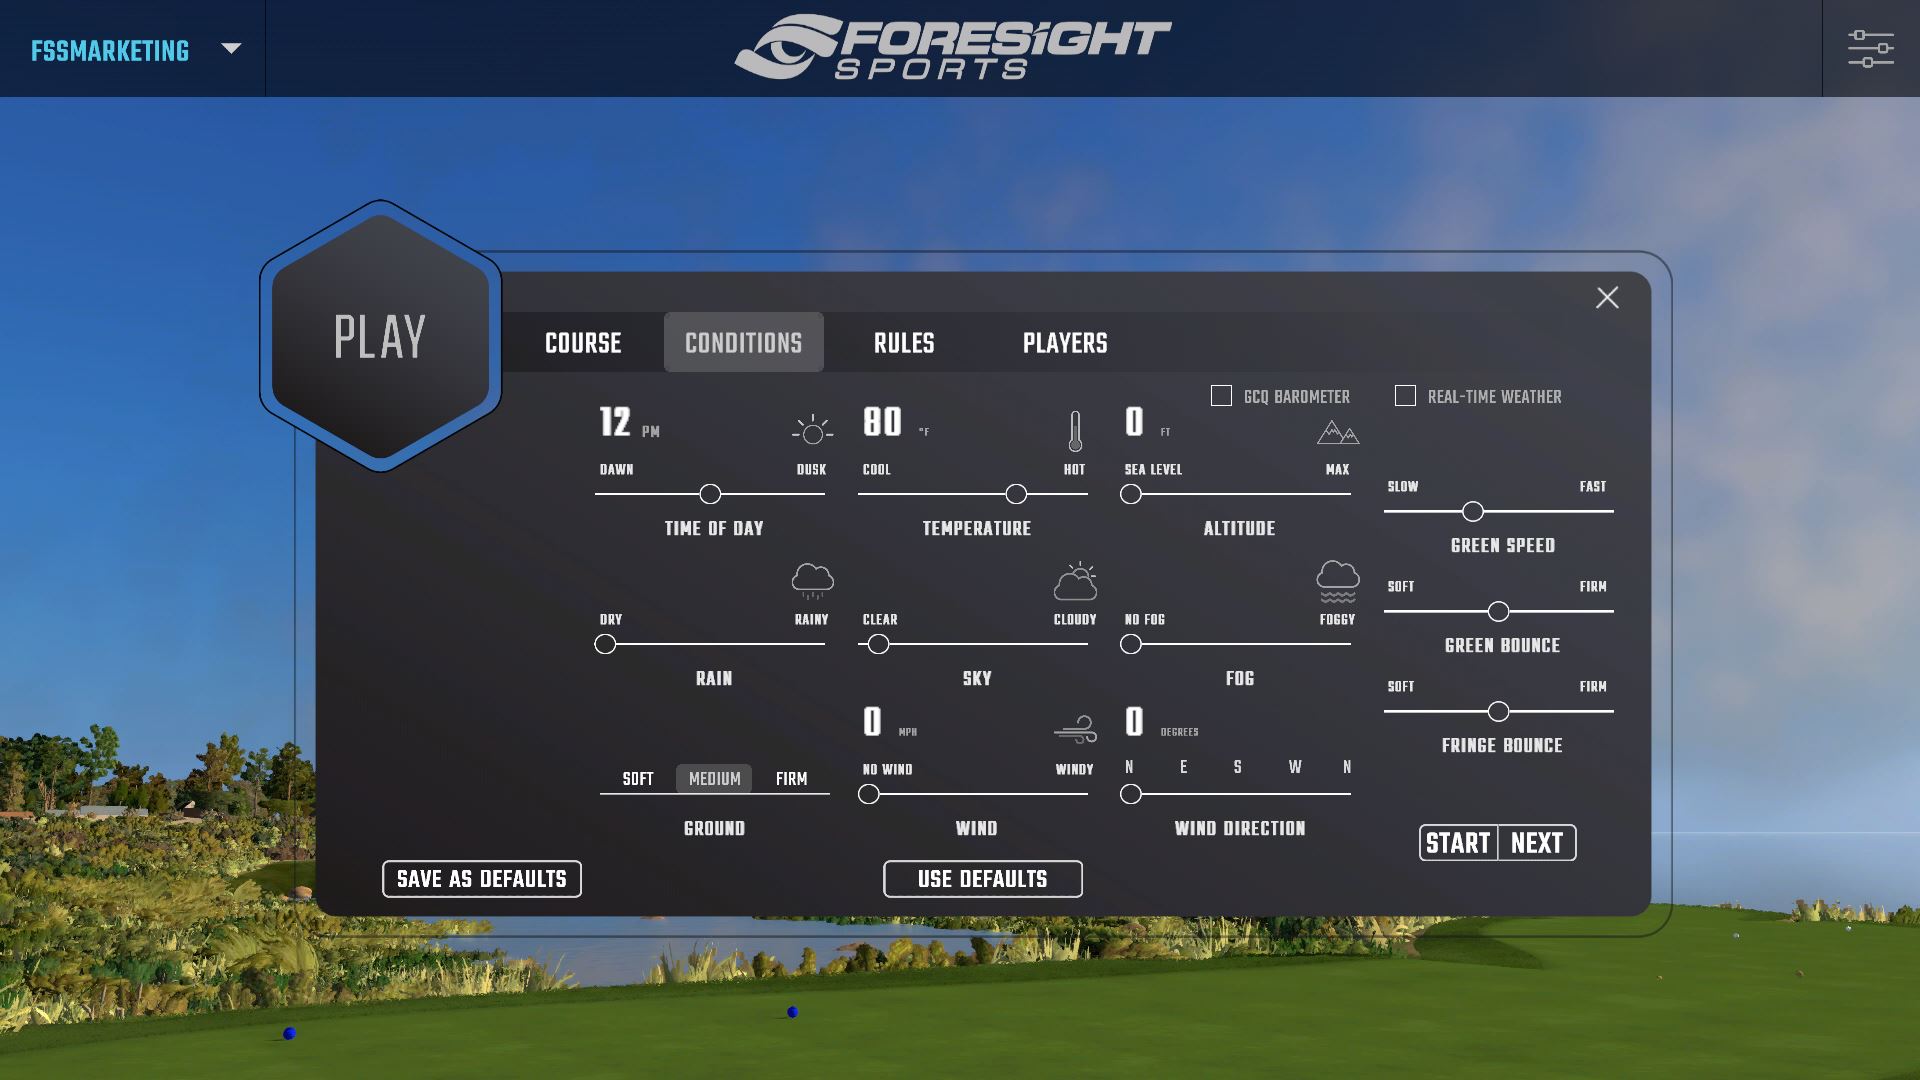
Selecting this option will apply the live weather conditions for the course selected. If real-time weather is applied, no other weather settings may be set. Note: This feature is only available with course versions 1.8 and higher and requires an internet connection.
Option 2: Custom Weather Selection
Select the desired weather settings, Altitude (Elevation), and course conditions for the round such as Green Condition, Time of Day, Wind, Rain, etc.
Device Barometer: You may select to allow the barometer installed within your Launch Monitor to read the PSI from your environment to replicate the air pressure of your local environment.
Note: Once completed, these settings cannot be edited in-game.
-
Select Rules
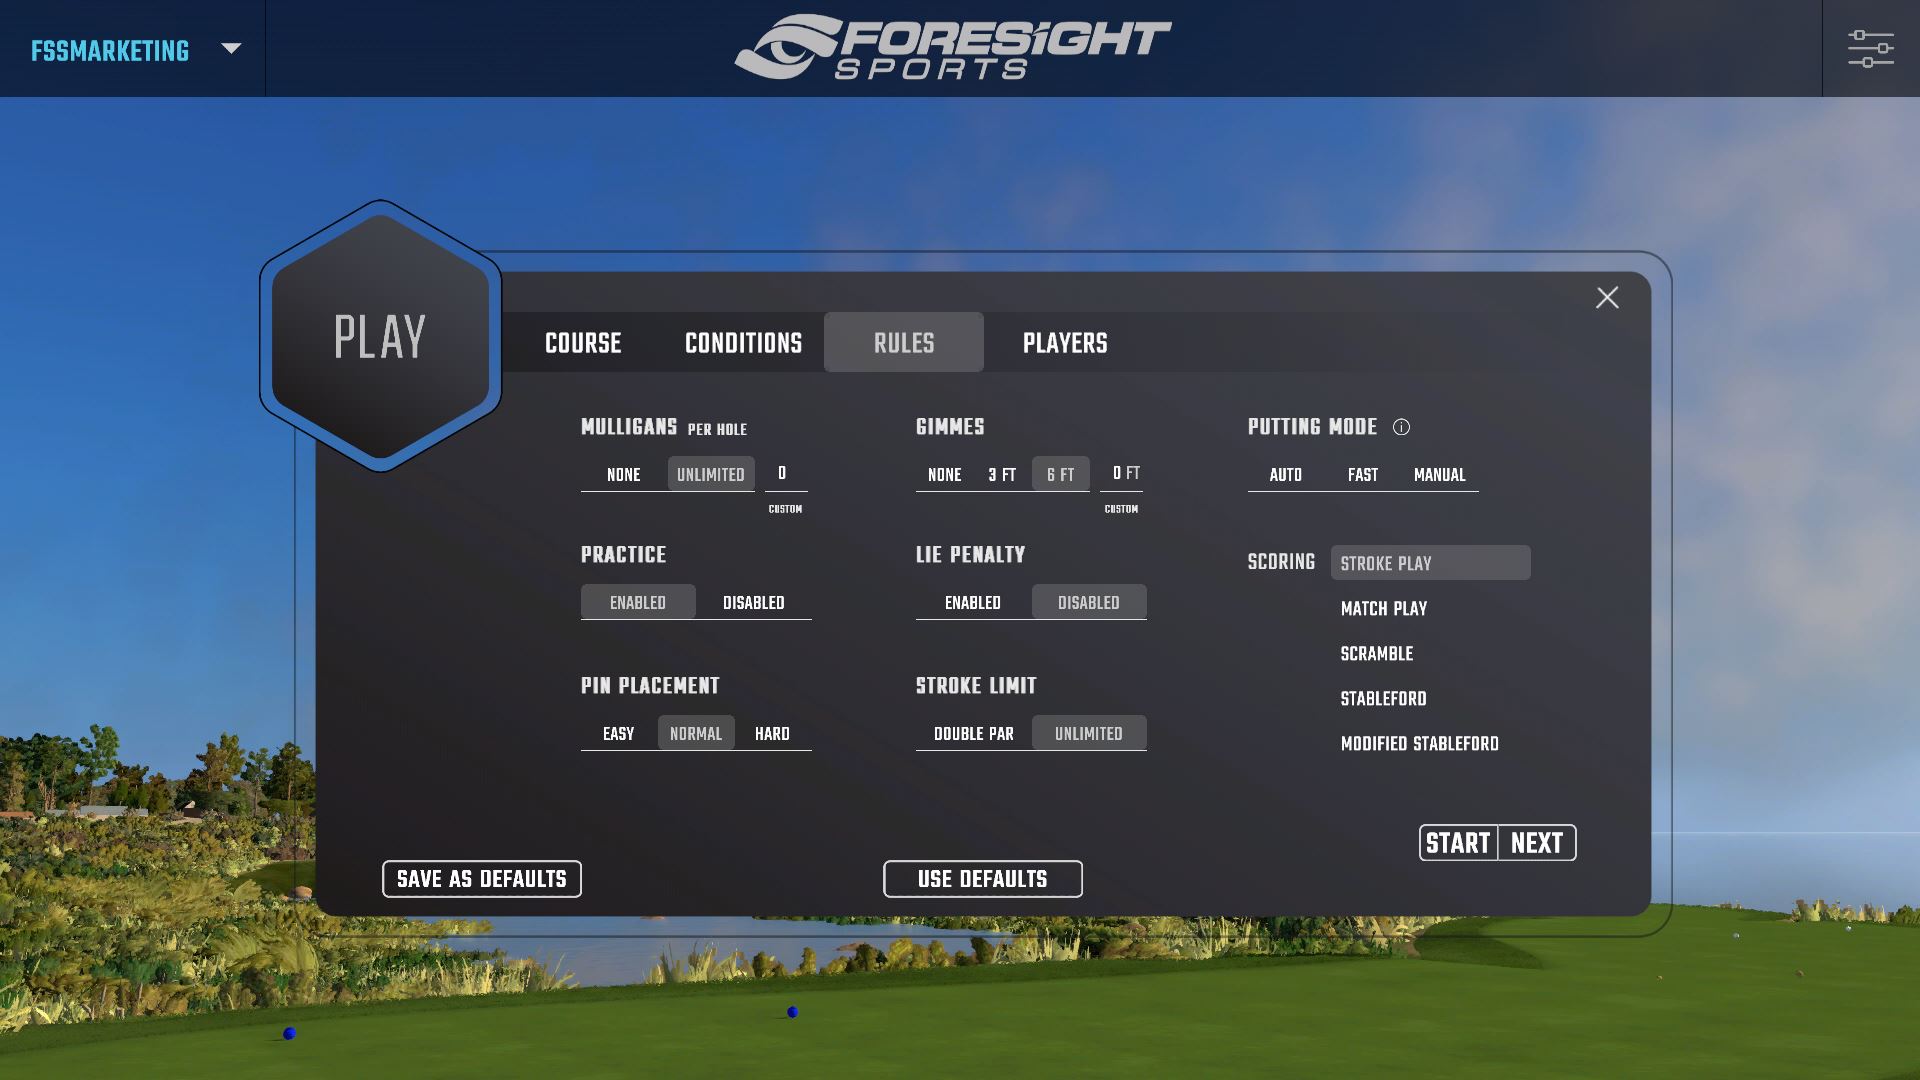
Pin Placement: Adjusts the difficulty of the pin on the green.
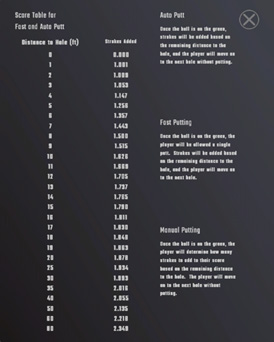
Putting Mode: Players can toggle between putting modes in the Play feature in the pre-game menu. Click the “?” symbol during pre-game setup to see the score table for Fast and Auto Putt.
Gimmes: Select a gimme distance for the round. Once a ball is inside the gimme distance, the player is given one stroke and the ball is considered holed.
Auto Putt: Pre-select the amount of putts a player takes once the ball is on the green.
Fast Putting: Player will be allowed one putt when on the green. If the putt is not holed, a tenth of a stroke is added for every foot remaining from the hole.
Manual Putting: Manually enter the amount of putts taken once a player’s ball is on the green.
Mulligans: Select the number of mulligans allowed per hole.
Stroke Limit: When enabled, a hole will end when a player's stroke count reaches double par.
Practice: When enabled, a player can enter practice mode at any time during the round. A player is able to practice the current shot without penalty to their score.
Scoring:
Stroke Play: Standard golf scoring. The player’s score is determined by the cumulative strokes taken throughout the round.
Match Play: Two players only. Scoring is based on the number of holes won during the round as opposed to number of strokes accumulated.
Scramble: Teams of at least two players are required. Once all players on a team hit, the team selects the best shot to use. This continues until the ball is holed.
Lie Penalty: When enabled, the player’s shot has the chance to be negatively affected by its lie.
Stableford: Point-based scoring system based on a player’s score on every hole. Lower scores equal more points.
Modified Stableford: Modified Stableford features higher penalties for poor shots and greater rewards for good shots.
-
Select Players
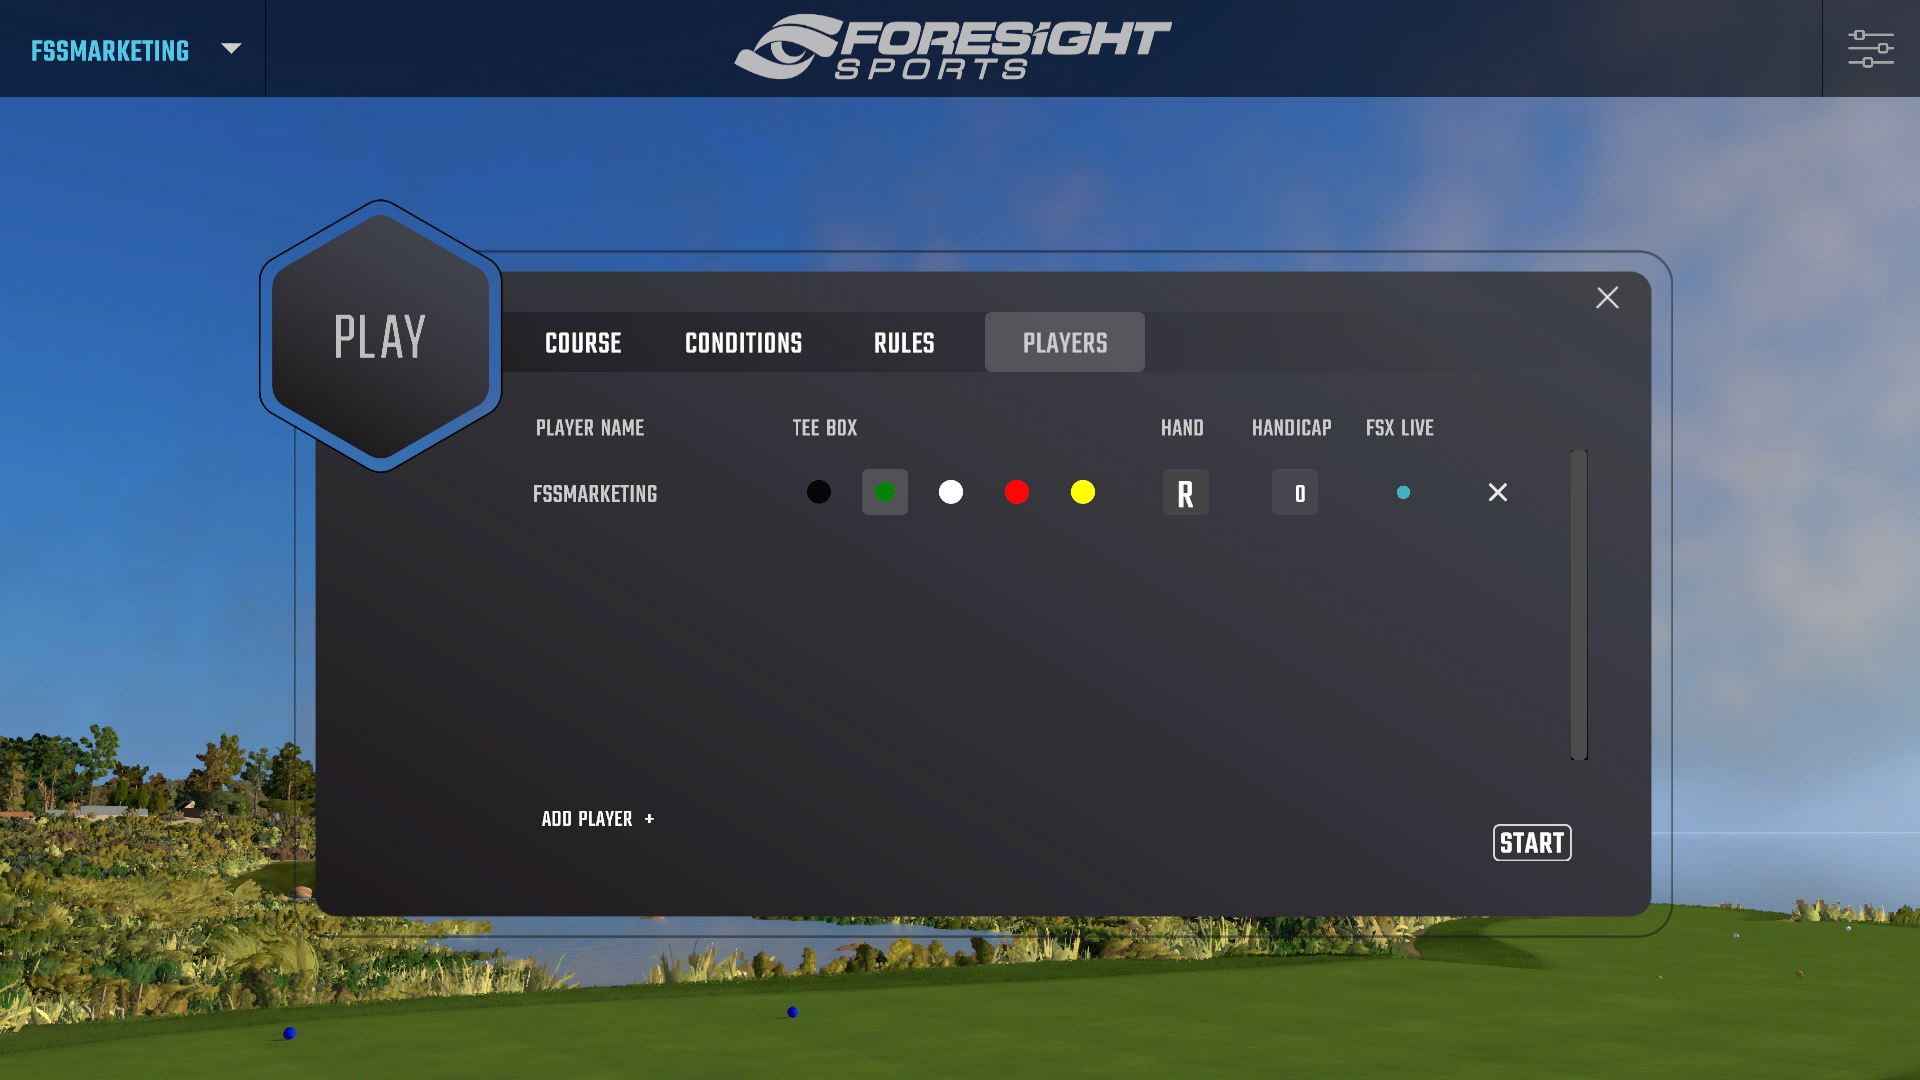
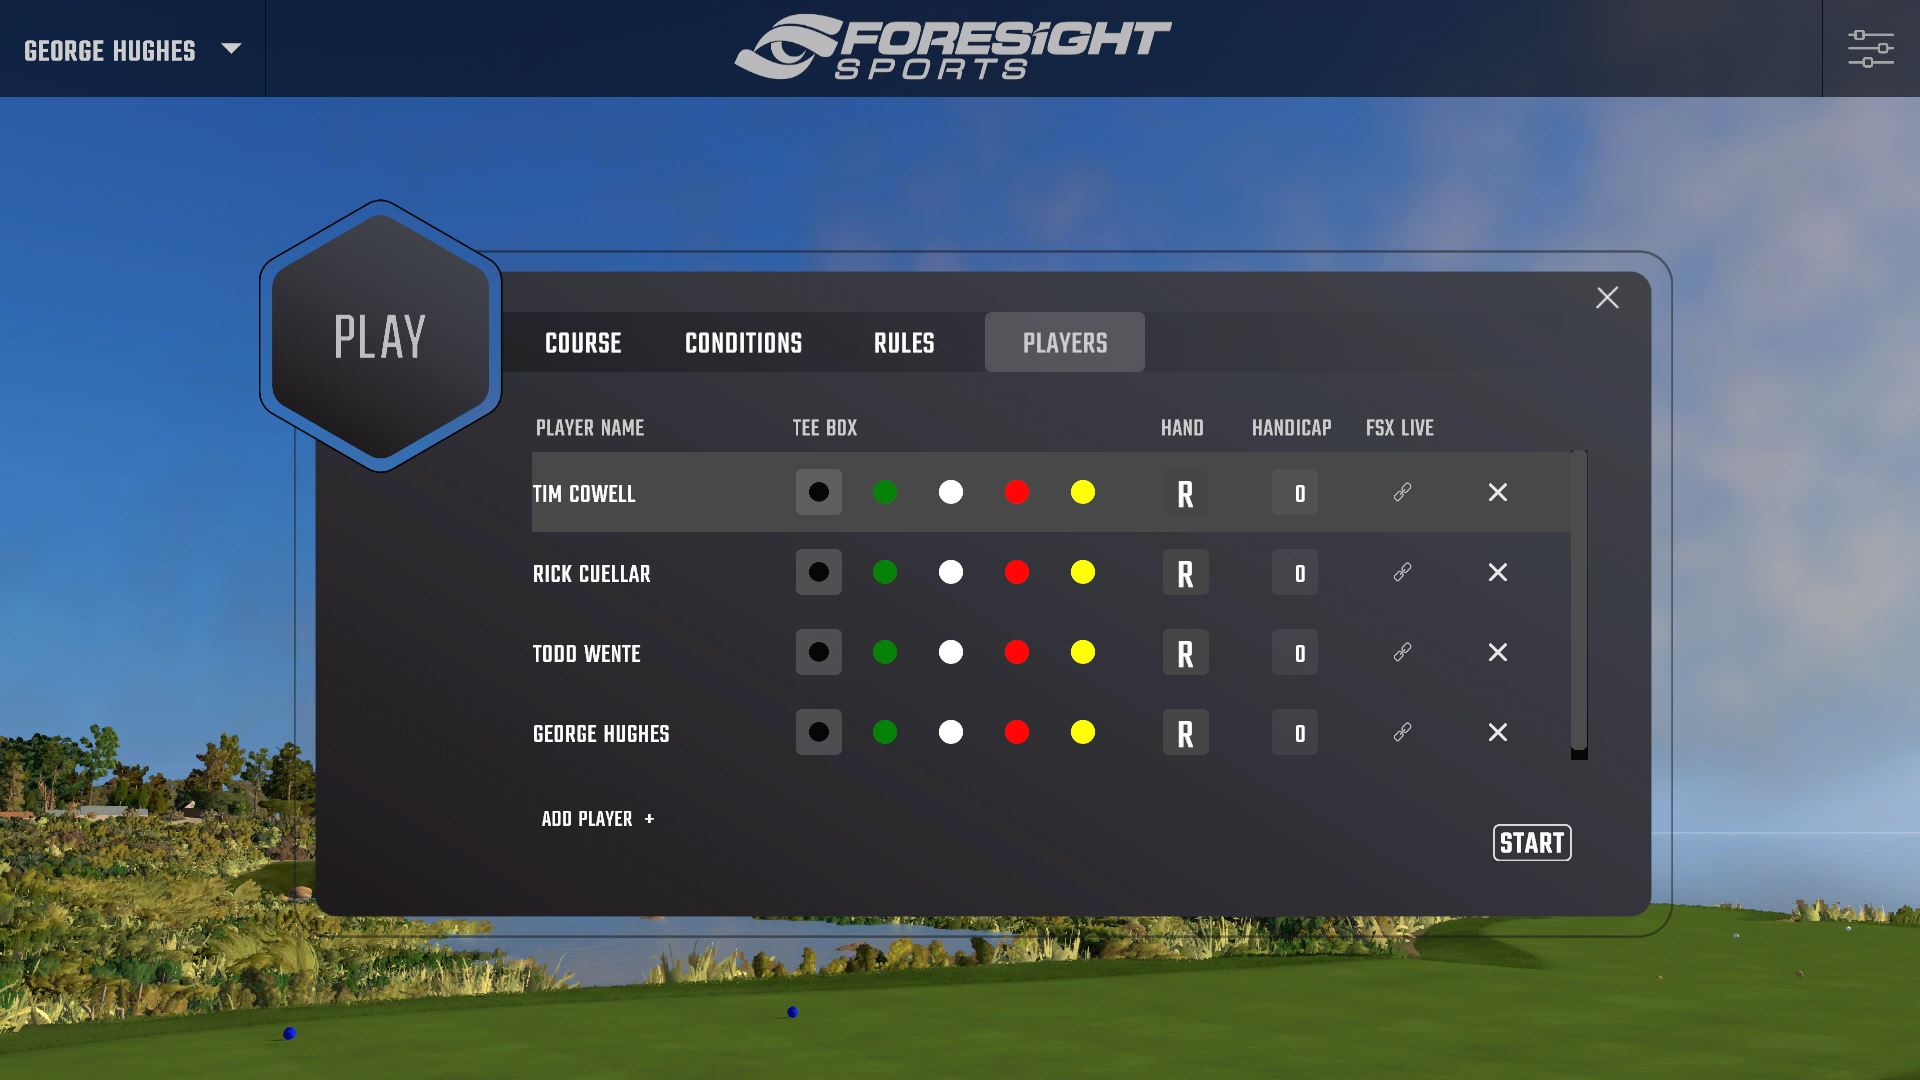
All players in the current session will be automatically added to the round. Players may be added or removed as desired. Tee box, handedness, and handicap may be set for each player. To associate an FSX Live account (formerly called My Performance) with an offline player (a player without or not currently linked to an FSX Live account), select the FSX Live icon.
Select Teams (if applicable)
If a game mode is selected that requires teams, they can be set on this screen. Clicking on the current team names will allow them to be edited.
-
Resuming a Saved Game
To resume a saved game, select the Resume Saved Game button located at the bottom of the Select Course screen.
-
Play-Game Interface
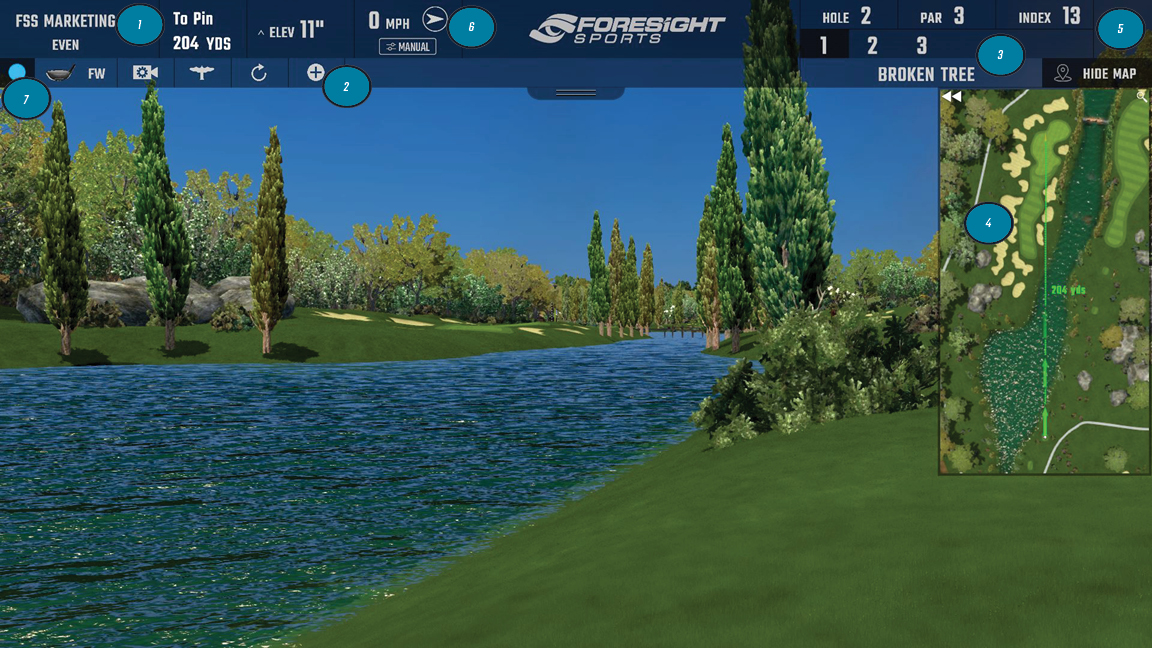
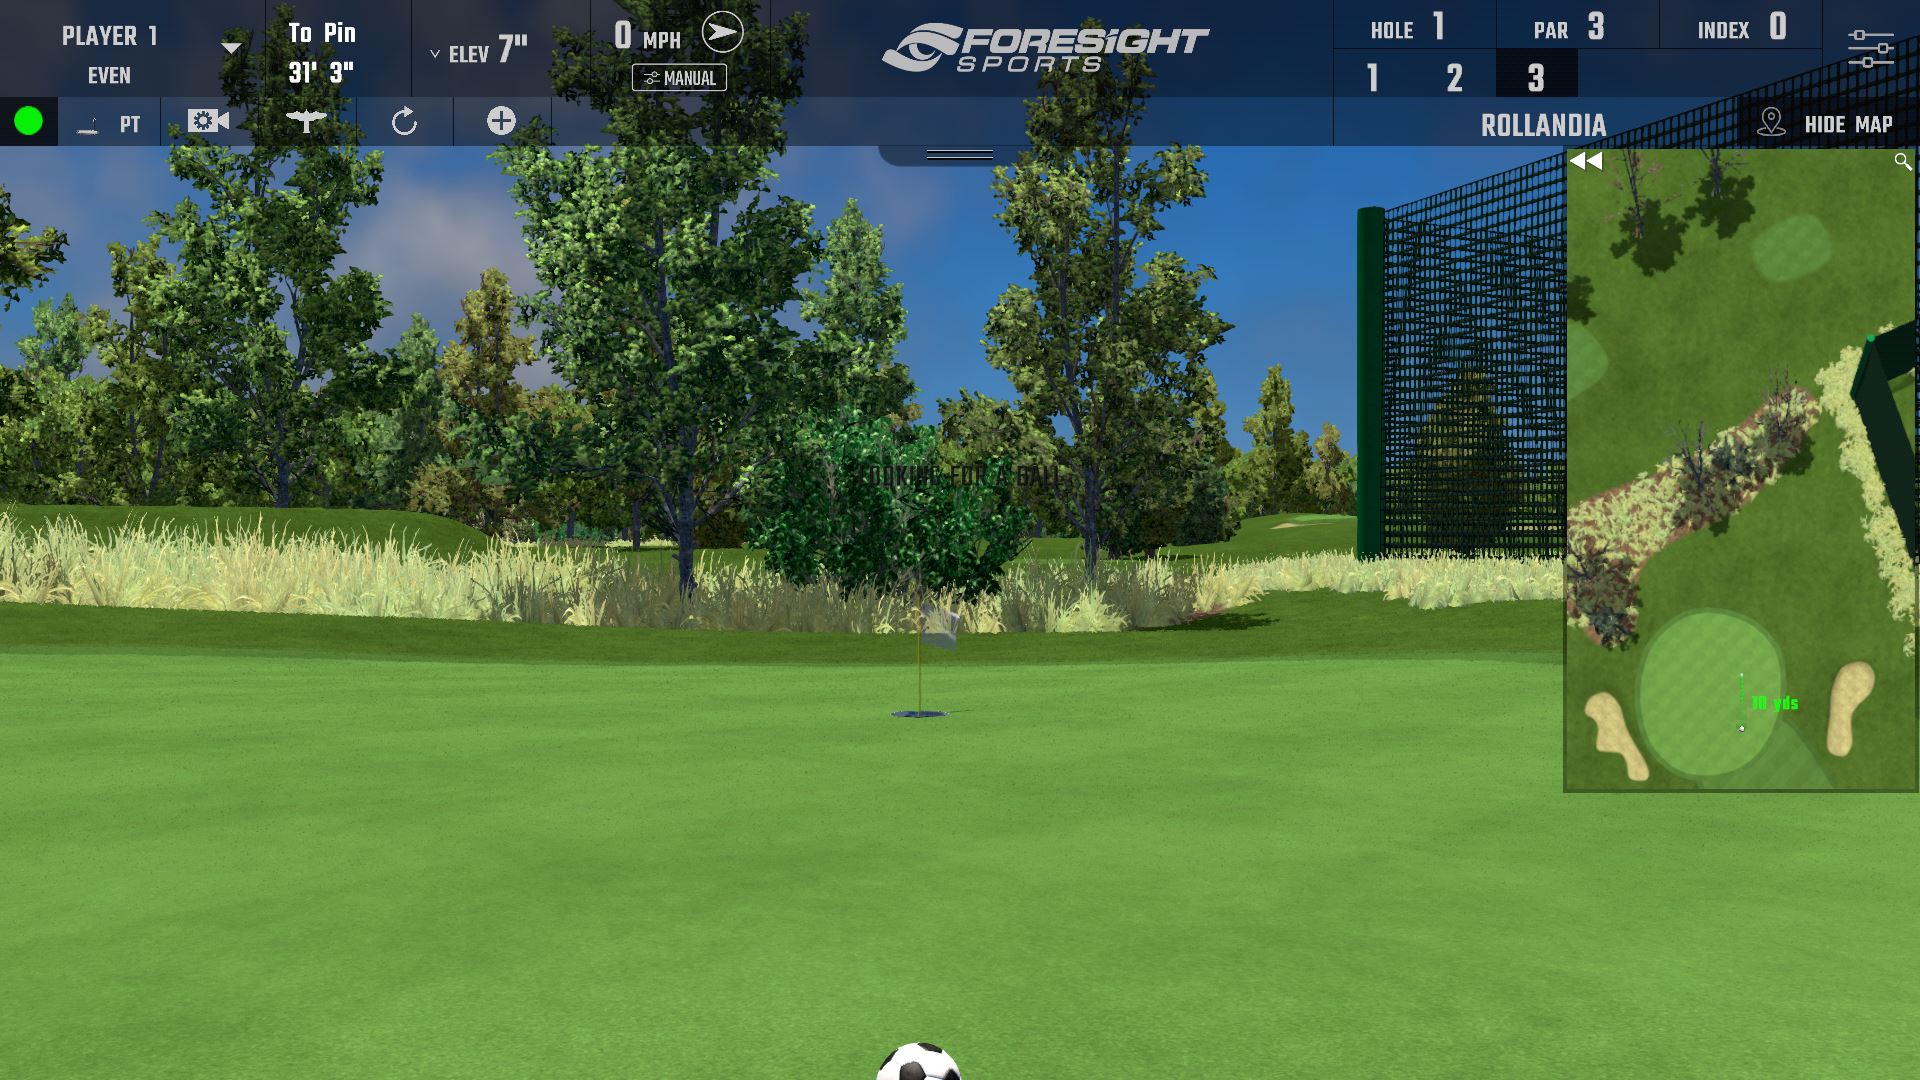
1. Player Menu
Switch to a different player at any time during the round (as long as they have not completed the hole) by selecting them through the player menu. Wind Speed, elevation and distance to the pin are also displayed next to the player menu.
2. Shortcuts Bar
Select and deselect shortcuts. Clicking the club icon will allow the player to select a new club.
3. Course/Hole Info
Displayed are the hole number, hole par, hole index and shot number.
4. Mini Map
The Mini Map can be expanded by clicking the double arrows and minimized by clicking the 'X' icon. Hovering the mouse over the Mini Map will display both the distance to the ball and to the pin from that location. A player’s aim can be adjusted by clicking anywhere on the Mini Map.
5. Dashboard
Add/change player information, edit the shortcuts bar, adjust in-game settings, and connect devices.
Note: Players can remove the in game HUD by clicking the tab below the Foresight Sports logo.
6. Wind Speed And Direction
Change wind speed and direction. Players can also use real-time weather conditions from their chosen course.
7. Device Connection Indicator
If a device isn't connected in game, this indicator will display a flashing symbol. Click the symbol to connect a device. A circle indicates a device is connected.
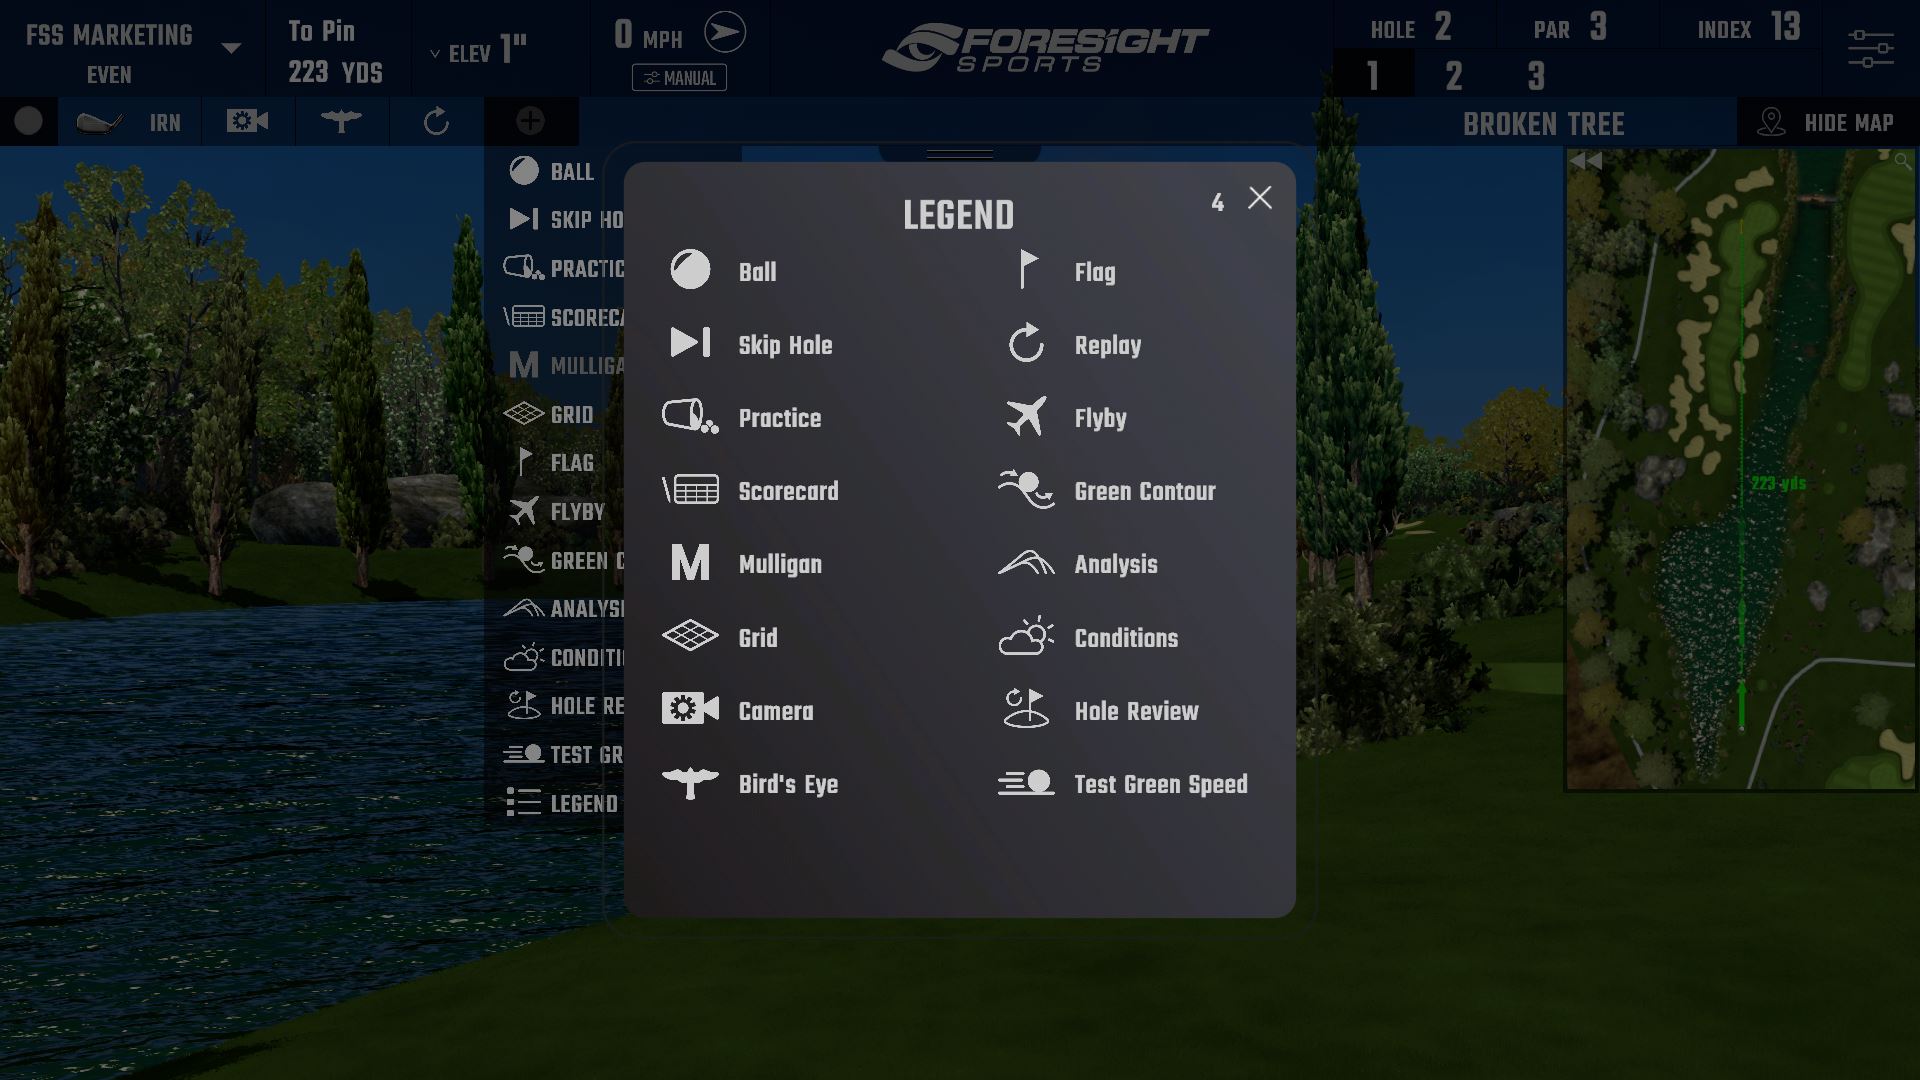
Shortcuts
Skip Hole: Moves the current player or all players to the next hole. Players will be given a score of 9
for the hole that was skipped.Practice: Enters practice mode. Player can practice the current shot without penalty to their score.
Note: only applicable if practice mode was enabled during round set-up.Scorecard: View the scorecard for the round.
Mulligan: Retake the previous shot without penalty (only applicable if mulligans were enabled during round set-up).
Analysis: View the data analysis screens for the current player.
Club: Change the club for the current player.
Grid: Toggle the green grid on and off.
Drop Balls: Add slope indicators to the green grid (only applicable if green grid is on). The opacity of the
green grid and slope indicators can be toggled by holding the CTRL key and selecting this option.View Camera: Change the in-flight camera view.
Hole Review: Review shots on holes already played. Select the Hole Review feature from the View menu in-game. Users can select a hole and review all their shots played on the chosen hole.
Bird’s Eye: Gives an aerial view of the entire hole.
Flag: Moves the camera to the location of the flag.
Replays: View any previously hit shot for the selected player.
Flyby: Gives a flyby of the current hole.
Ball: Toggle ball type, choose between standard, premium, range and consumer.
Green Contour: When selected, will show the green contours of the current hole using a green grid.
Test Green Speed: Change the green speed by using our interactive stimp meter..
Drop Feature
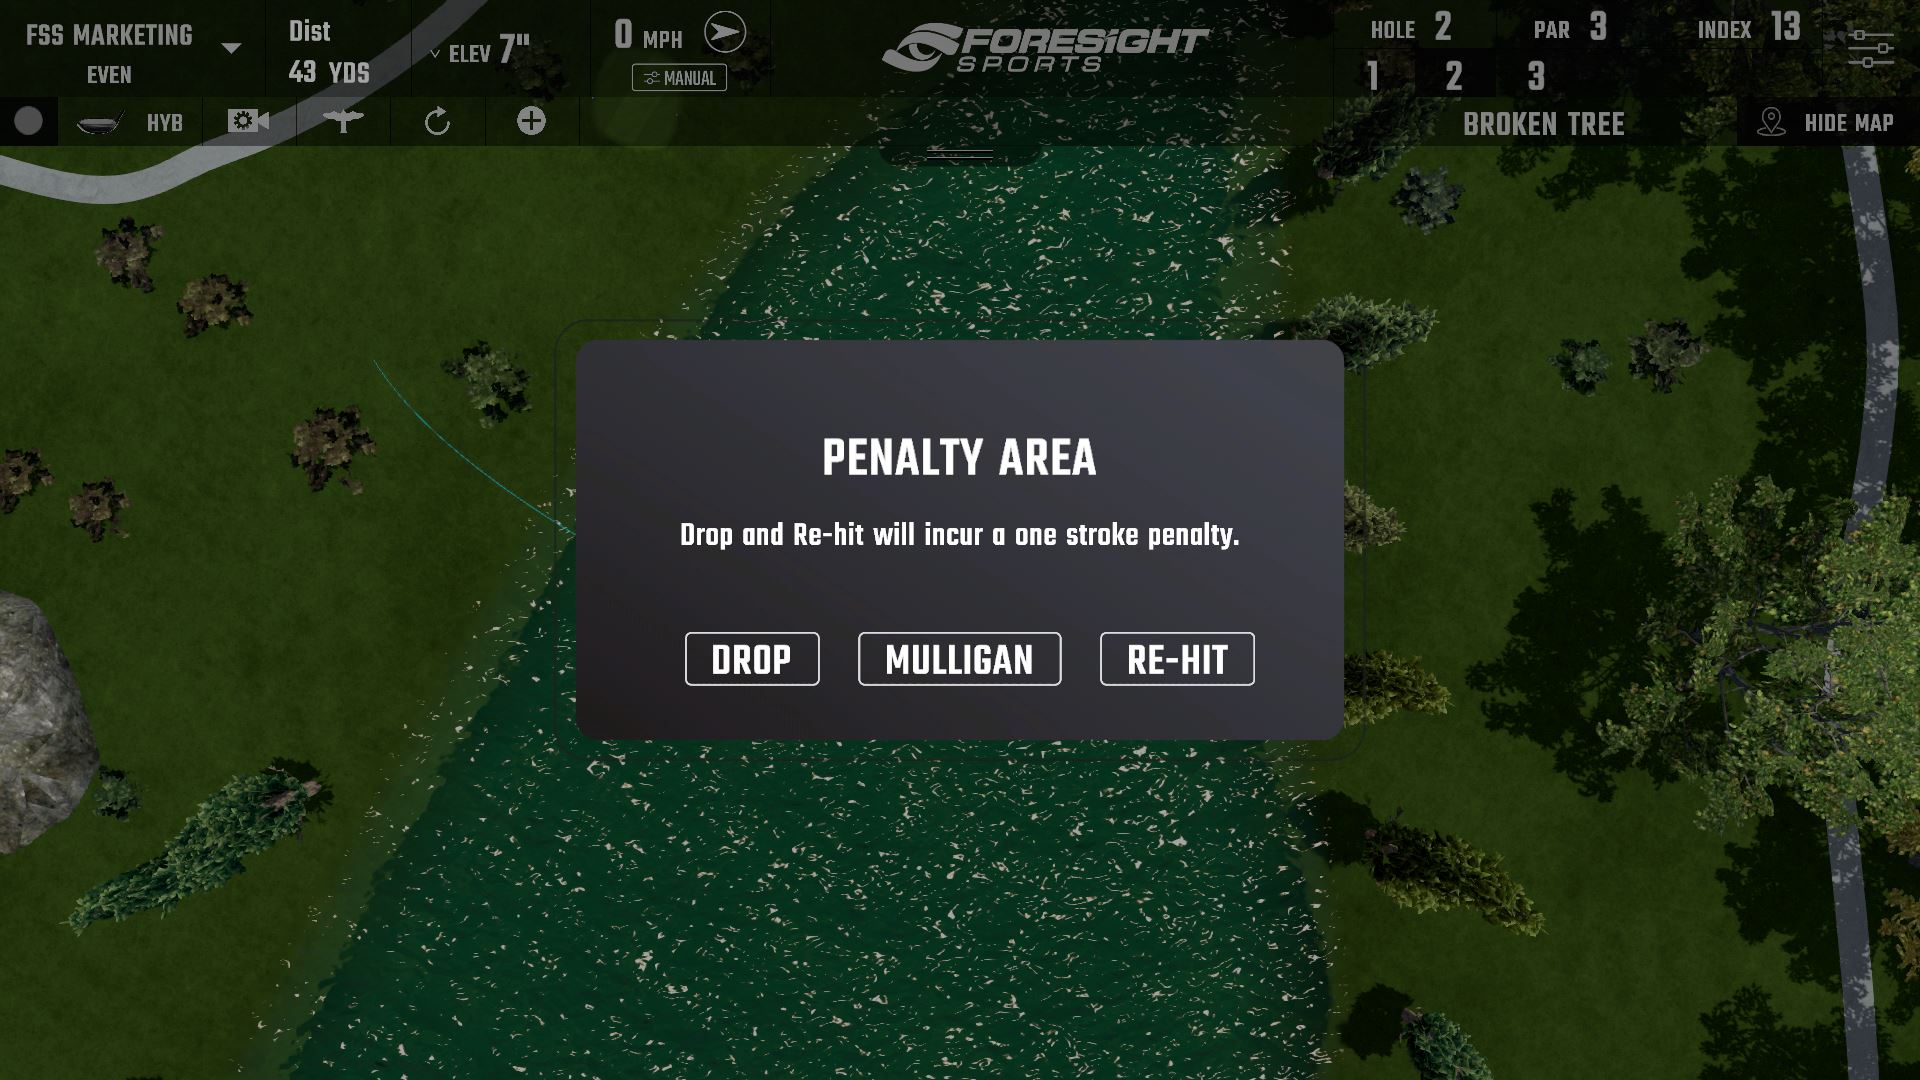
In the event that the user hits a shot into a 'penalty area' (hazard) or out of bounds, users will be asked to select whether to rehit from their original shot position, take a mulligan or take a drop.
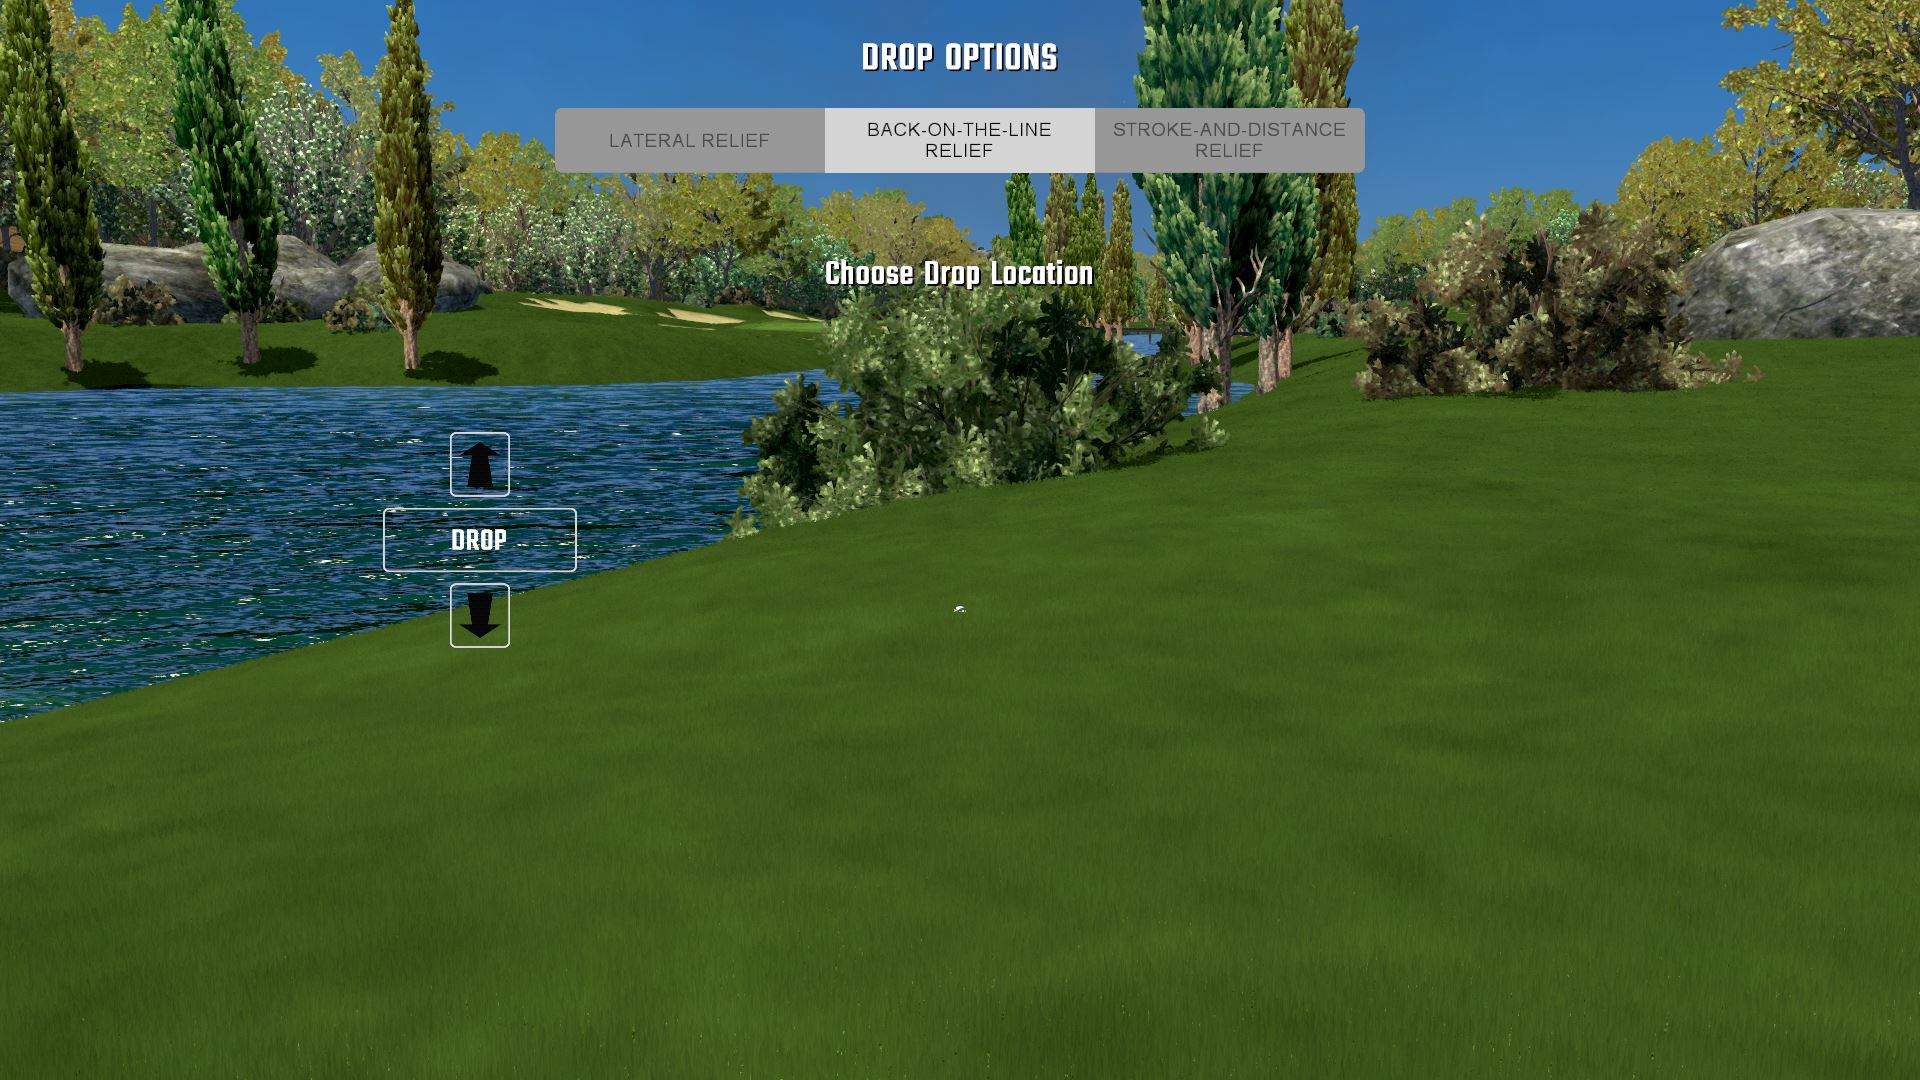
Lateral Relief - Take a drop two club lengths from the point of entry into the hazard.
Back-On-The-Line Relief - Take a drop on a line from the hole and through the point of entry into the hazard. A player can go back as far as they wish before determining where to drop the ball.
Stroke-And-Distance Relief - Take a 1 stroke penalty and re-hit the shot.
Should the user choose to take a drop, they will be prompted to use the drop feature. To place their ball, users should use the directional buttons or the arrow keys on their keyboard to navigate to their new drop position.
-
Footgolf
Footgolf is accessible from the play menu. Simply select the Footgolf icon and proceed to course setup, conditions, rules and add/remove players before launching a game. For players using a soccer ball with the multi-sport add-on, the GCHawk will automatically switch to multi-sport mode on game launch.
Note: Footgolf can be played using a golf ball and a Foresight Sports launch monitor. However, if players would like to play Footgolf with a soccer ball, they require a GCHawk with the multi-sport add-on enabled. Multi sport is not supported by the GCQuad and GC2 at this time.
For more information on how to add these features, please contact your sales representative.
Please also be aware that the game uses soccer ball aerodynamics. Players should expect differing flight patterns if using a golf ball.
-
-
Compete
-
Compete Modes
Compete online and in local contests in the compete menus. The compete menu is divided into three sections:
Leagues: Join and compete in online leagues. Please note, players must be signed into their FSX Live account to access league play. If users cannot remember their login details, they can recover their FSX Live account details here by clicking 'sign in' and 'forgotten password'.
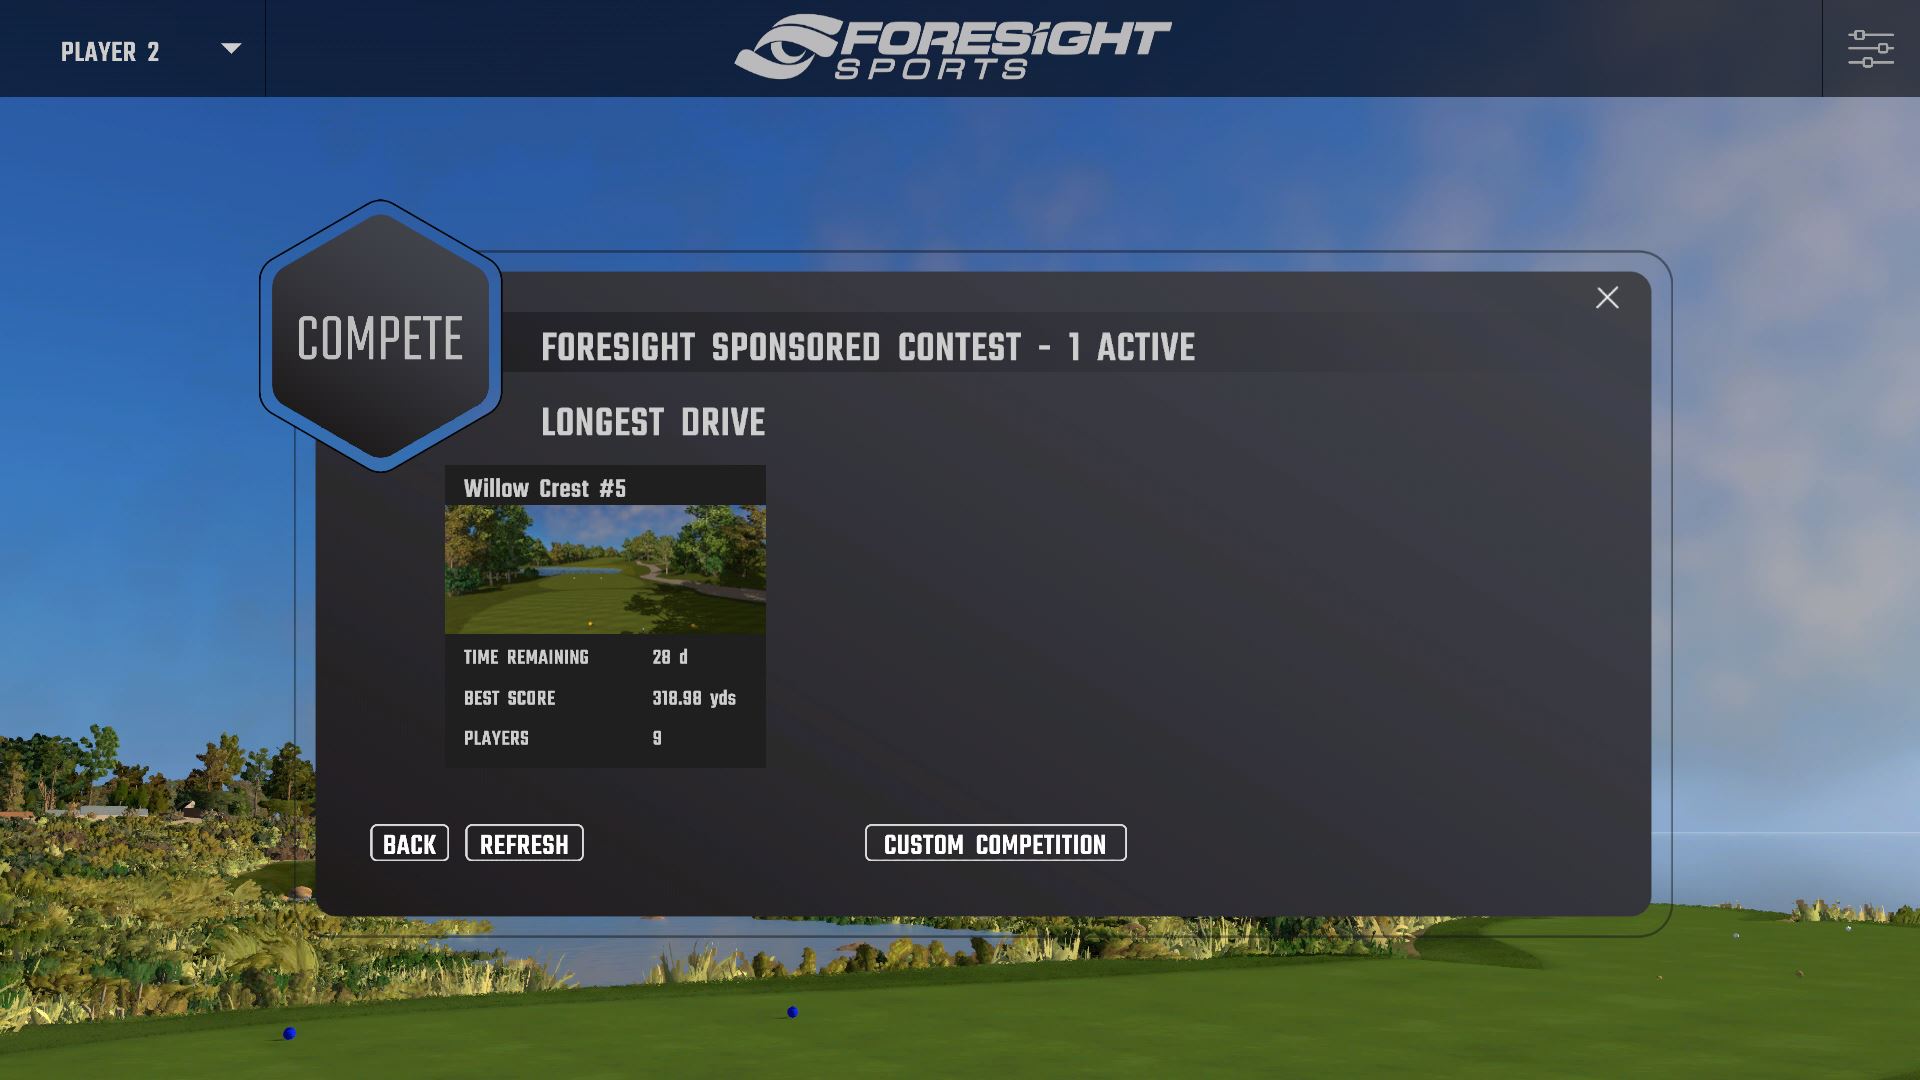
Competitions: Take part in online and local competitions including: Closest To The Pin, Long Drive Contests, Skills Challenges And Tournaments.
Games: Glass Break and Inside Six Feet.
Leagues
Select 'Leagues' from the compete menu. Users will be prompted to 'sign in' or create a new FSX Live account.
At the league menu, users can select 'join a league' by entering their league join or activation codes. Alternatively users can select an available league from the list and click 'next'.
At the league screen, select an active competition and click next to continue.
Select 'join contest' to begin.
Creating Custom Leagues
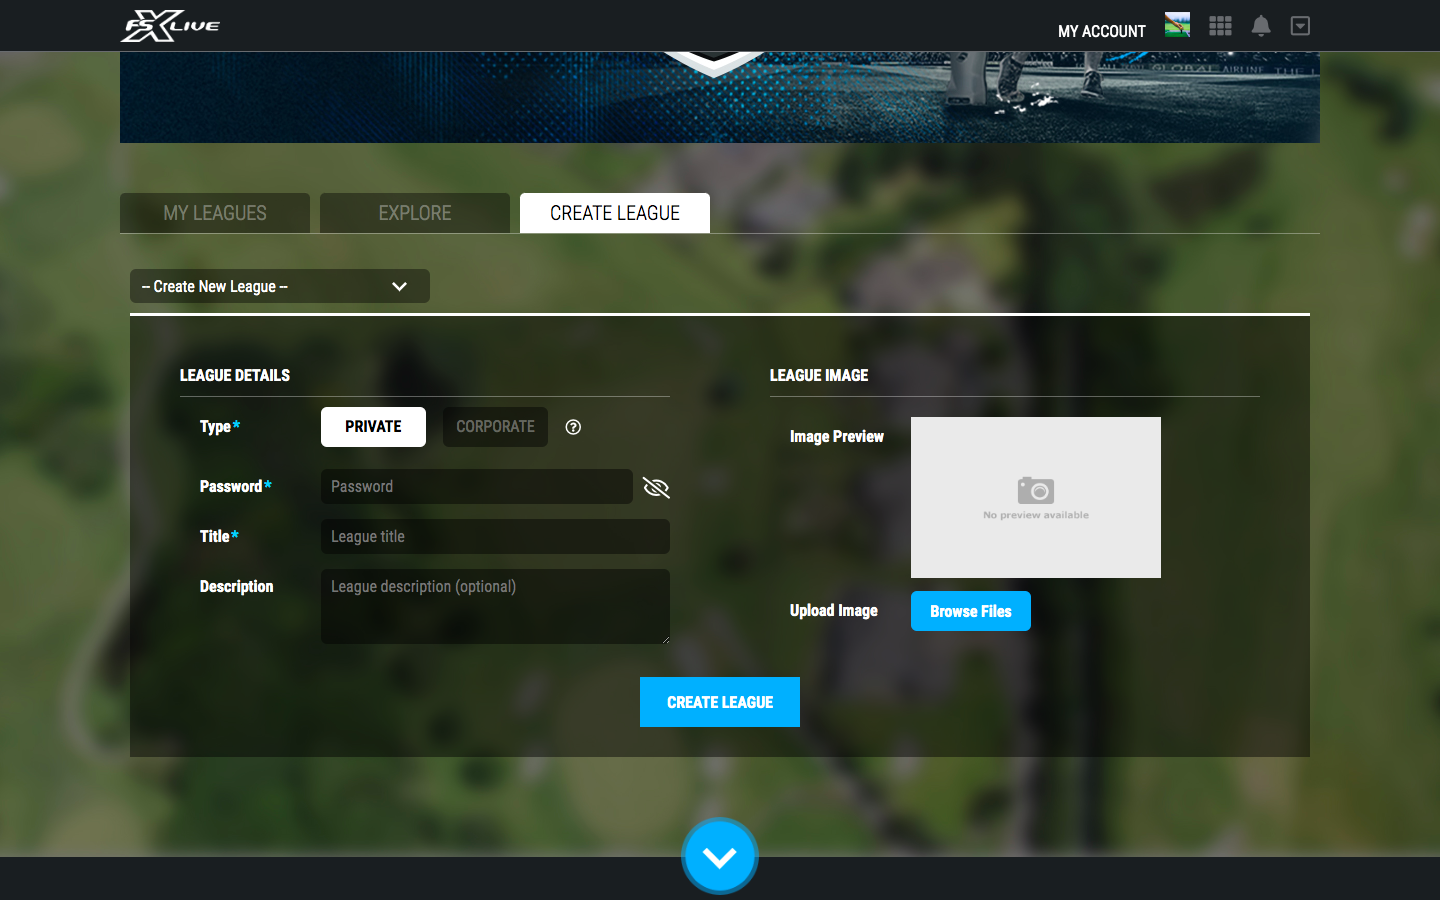
Users can create their own custom private and corporate leagues by logging into their FSX Live account here.
From the homepage users should select the Leagues tab (pictured).
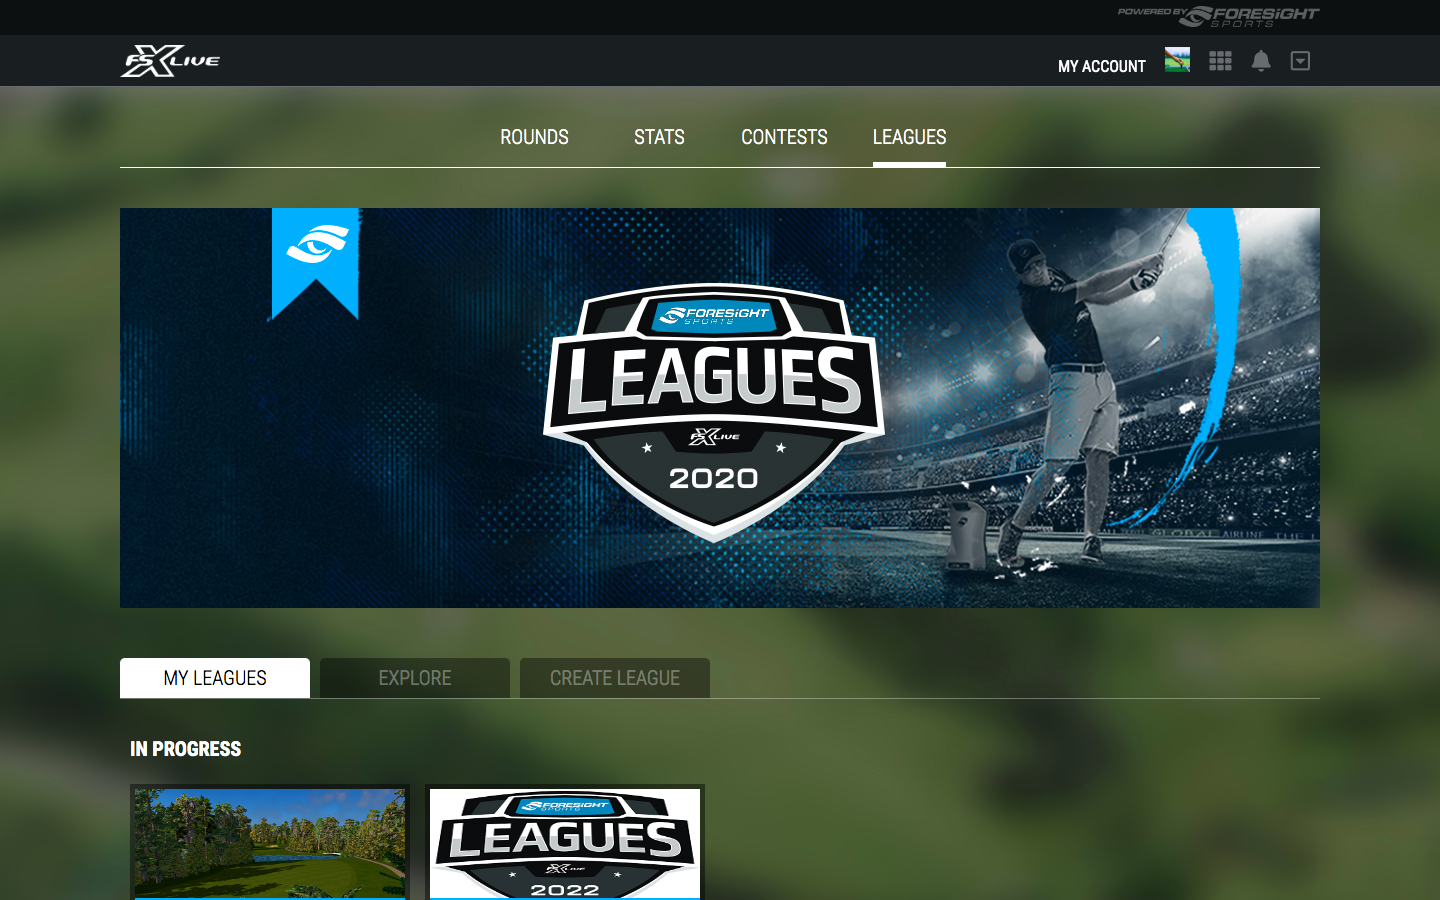
Users can see their existing leagues in the My Leagues tab and find new leagues to join by selecting the Explore tab. Select the Create League tab to begin new league creation.
Competitions
Click the custom challenge or competition tab in your chosen game mode to create a custom competition. Users can create four types of custom competitions: custom long drive contests, custom closest to the pin contests, custom skills challenges and tournaments.
Custom Long Drive and Closest To The Pin Contests
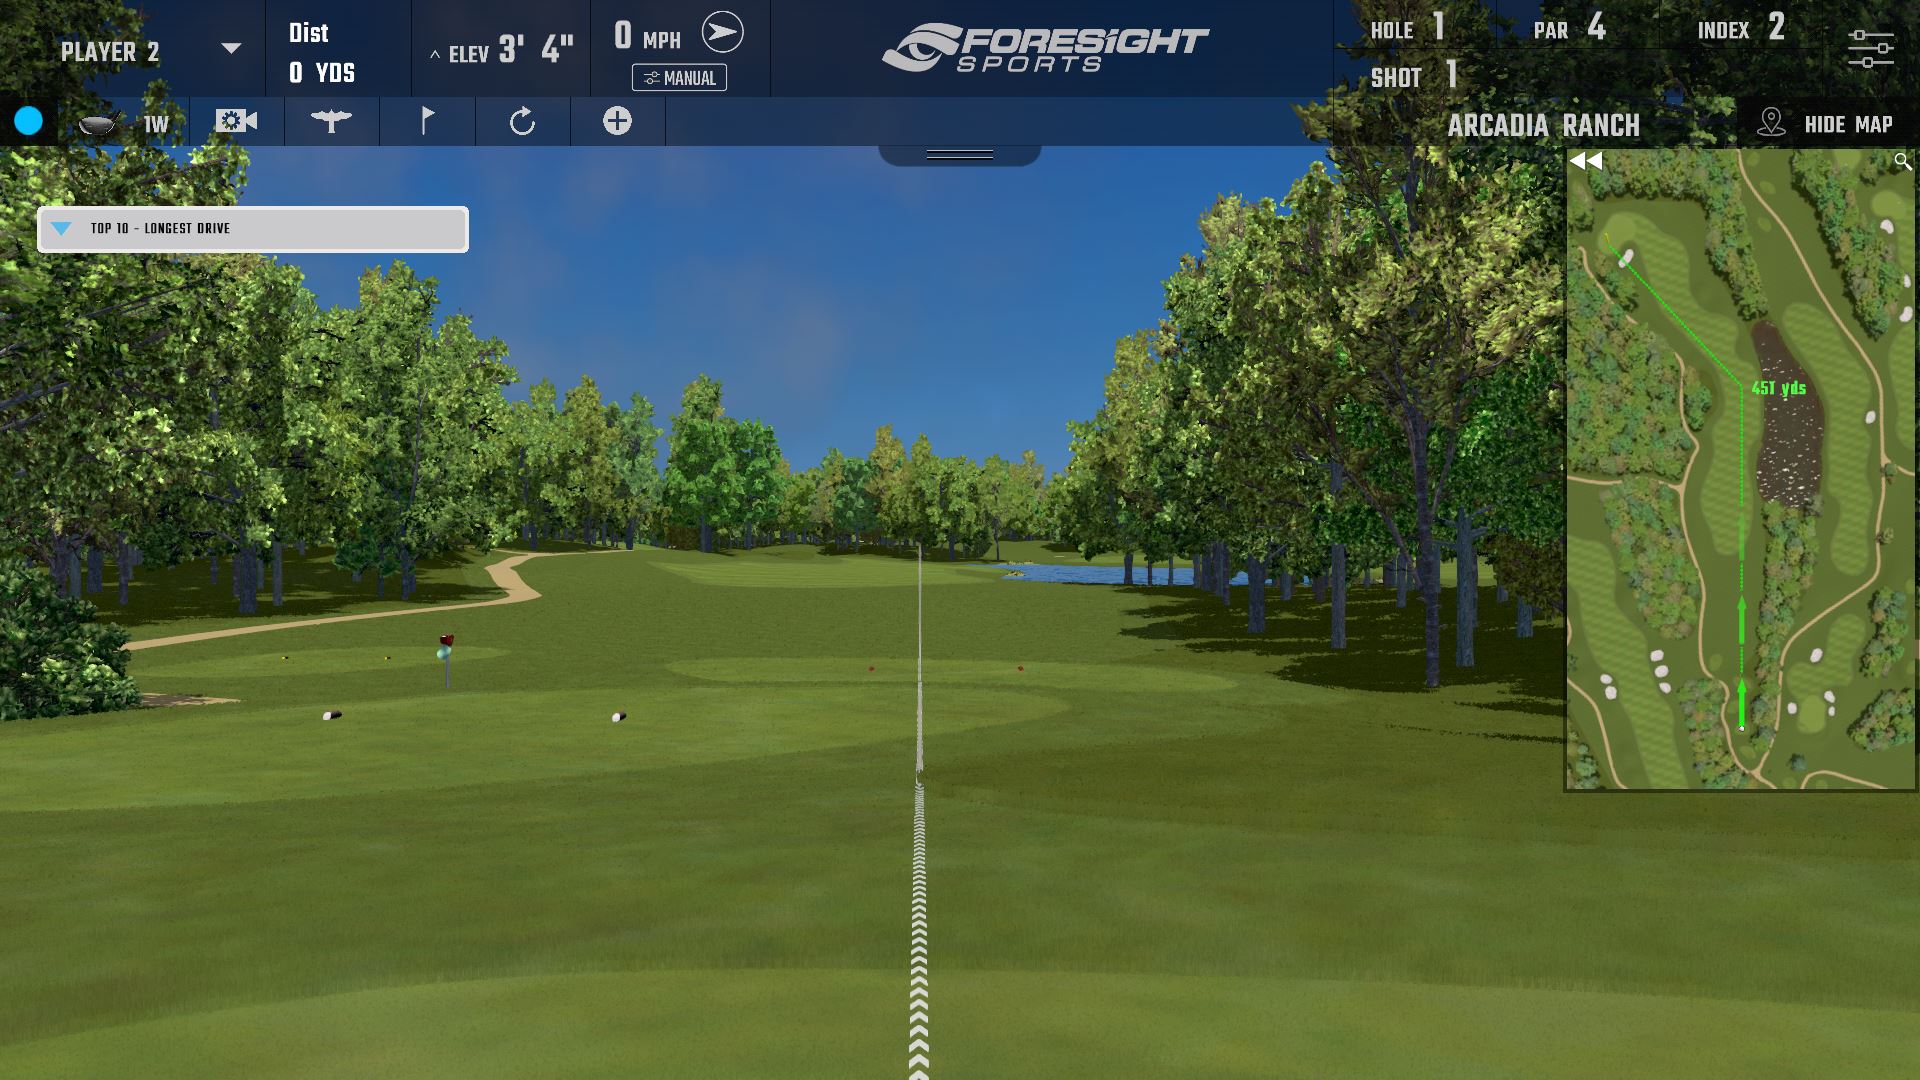
To create a custom long drive or closest to the pin contest simply select the custom competition icon within the corresponding mode. Users will be prompted to choose a course, before selecting their conditions and starting a game.
In-game users can switch players by selecting the players icon (top left).
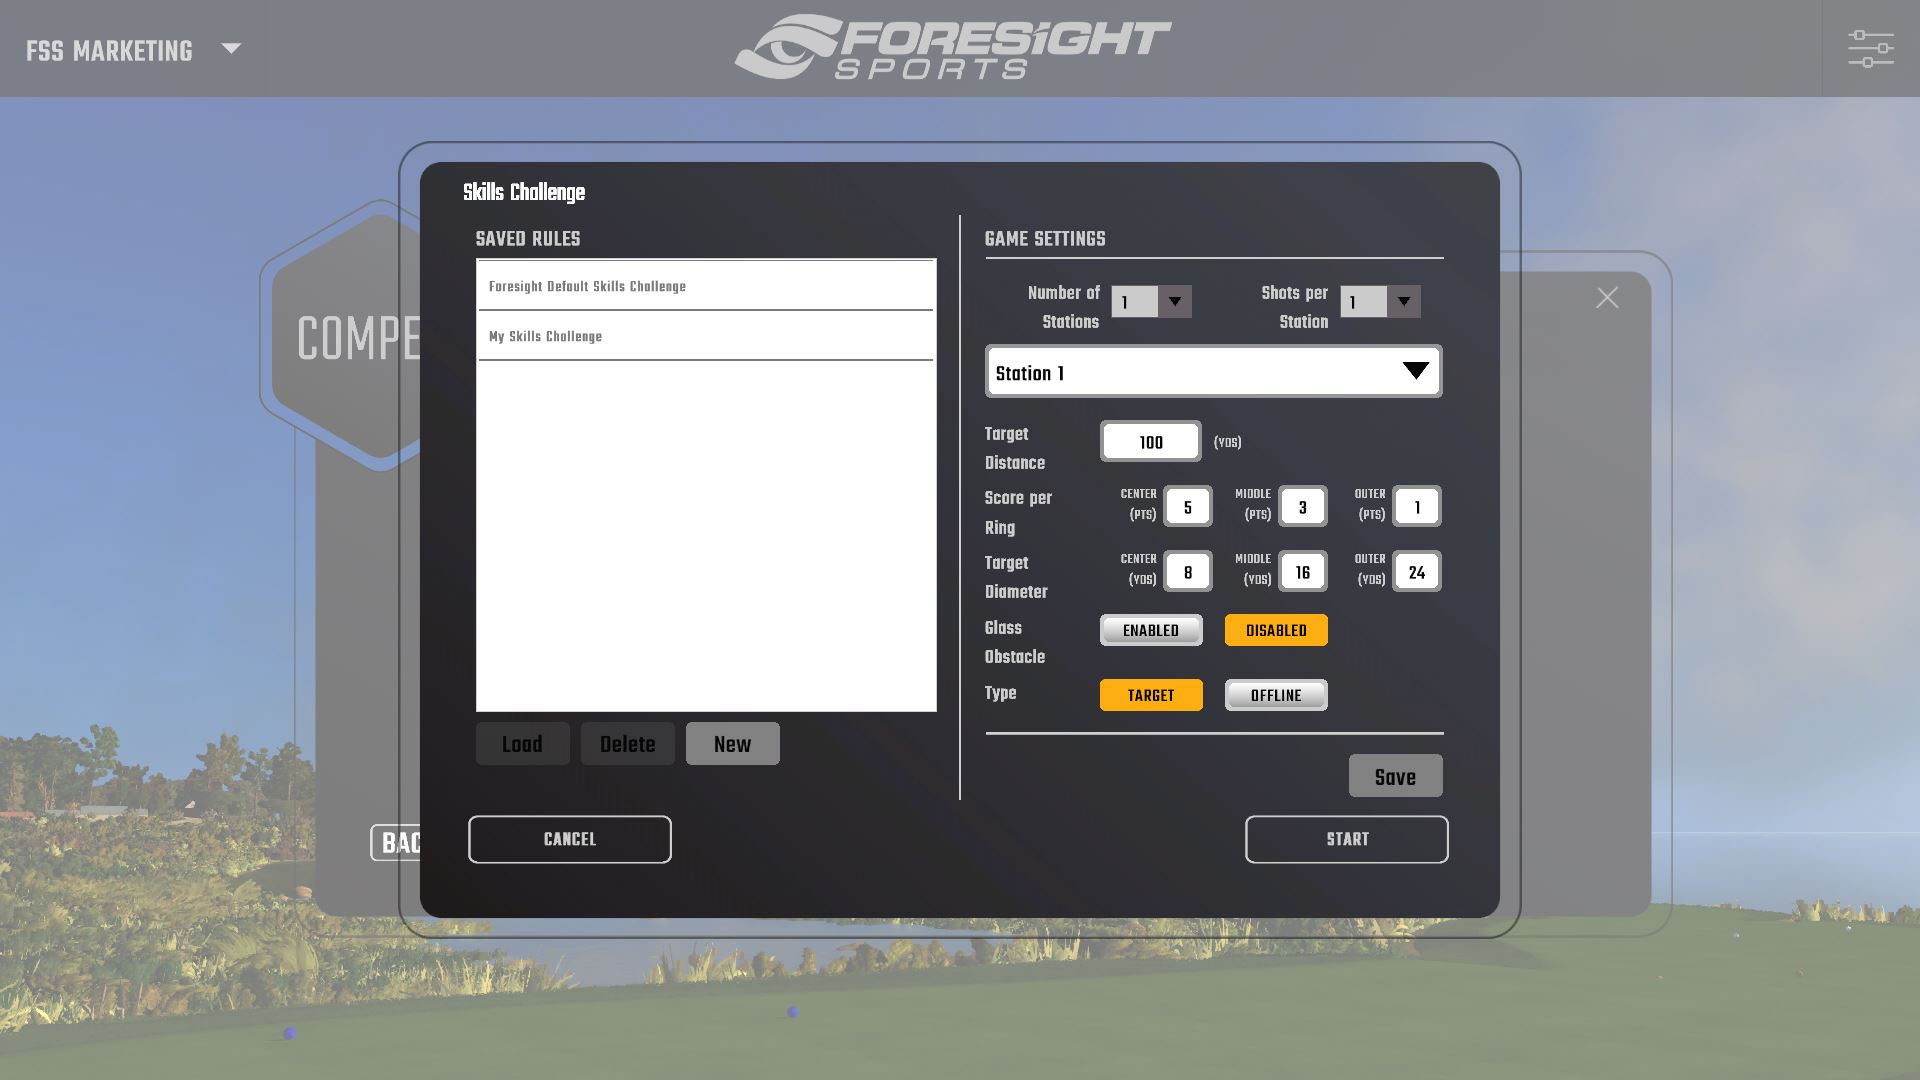
Custom Skills Challenge
The image below shows players how to create a custom skills challenge.
After clicking New, enter a new name for the Custom Skills Challenge. Next, select the number of stations and number of shots per station. Players may customize target distance and diameter, score per ring, and add obstacles for each station. After each station has been customized, click the Save button in the bottom right corner to save custom settings. Once settings have been saved, click Start to begin.
Creating a Local Contest
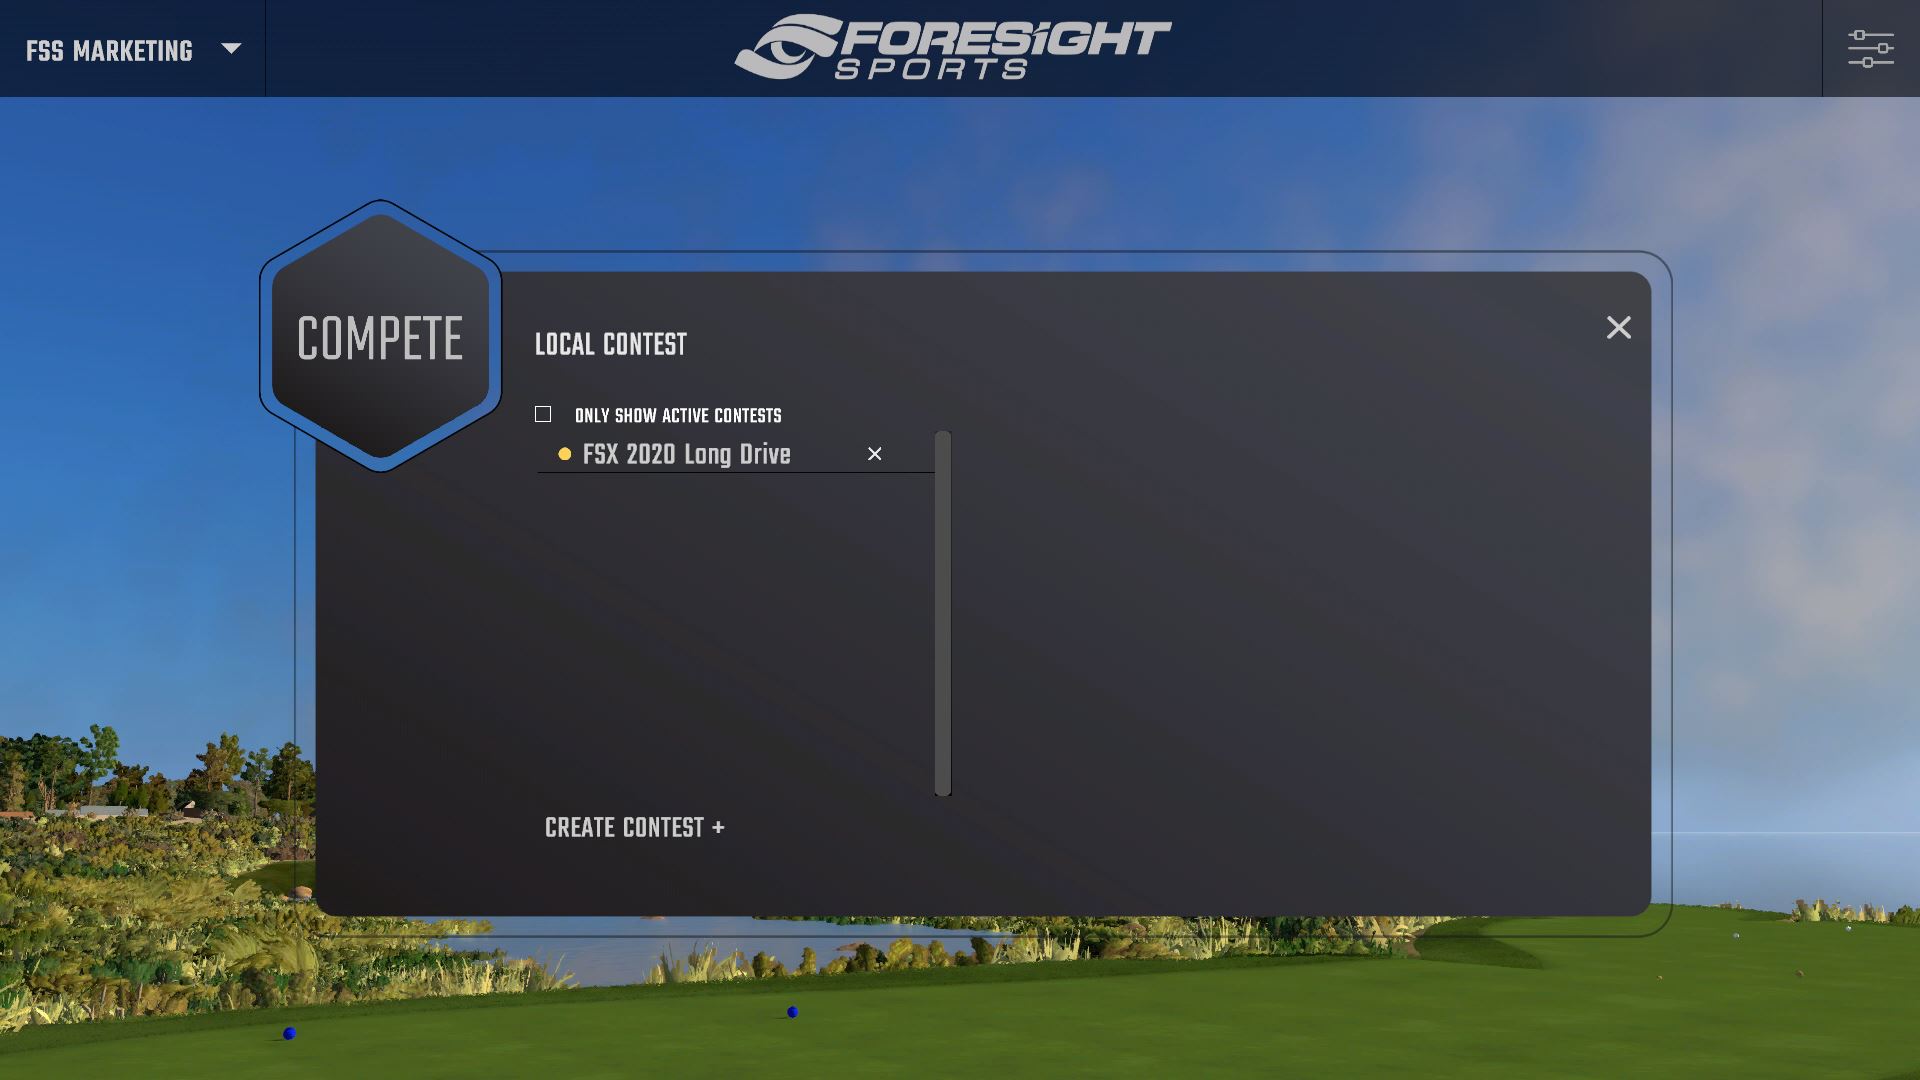
Players without FSX Live (formerly MyPerformance) accounts can participate in local contests. First, please ensure local contests are enabled within FSX 2020 by toggling the local contest button. This is located in the settings under language and units. This will reveal the local contests icon in the compete menu. Players should select this button to begin creating local contests. During local contests, both online and offline player scores are displayed in a local leaderboard; however, no contest data is uploaded to the cloud.
Local contests may be held on golf courses or the driving range. Contests may be created and customized by selecting the Create Contest button at the bottom of the page. Contest status is indicated by the color to the left of the contest name. Expired contests are shown in gray, active contests in orange, and upcoming contests in blue.
Games
Glass Break
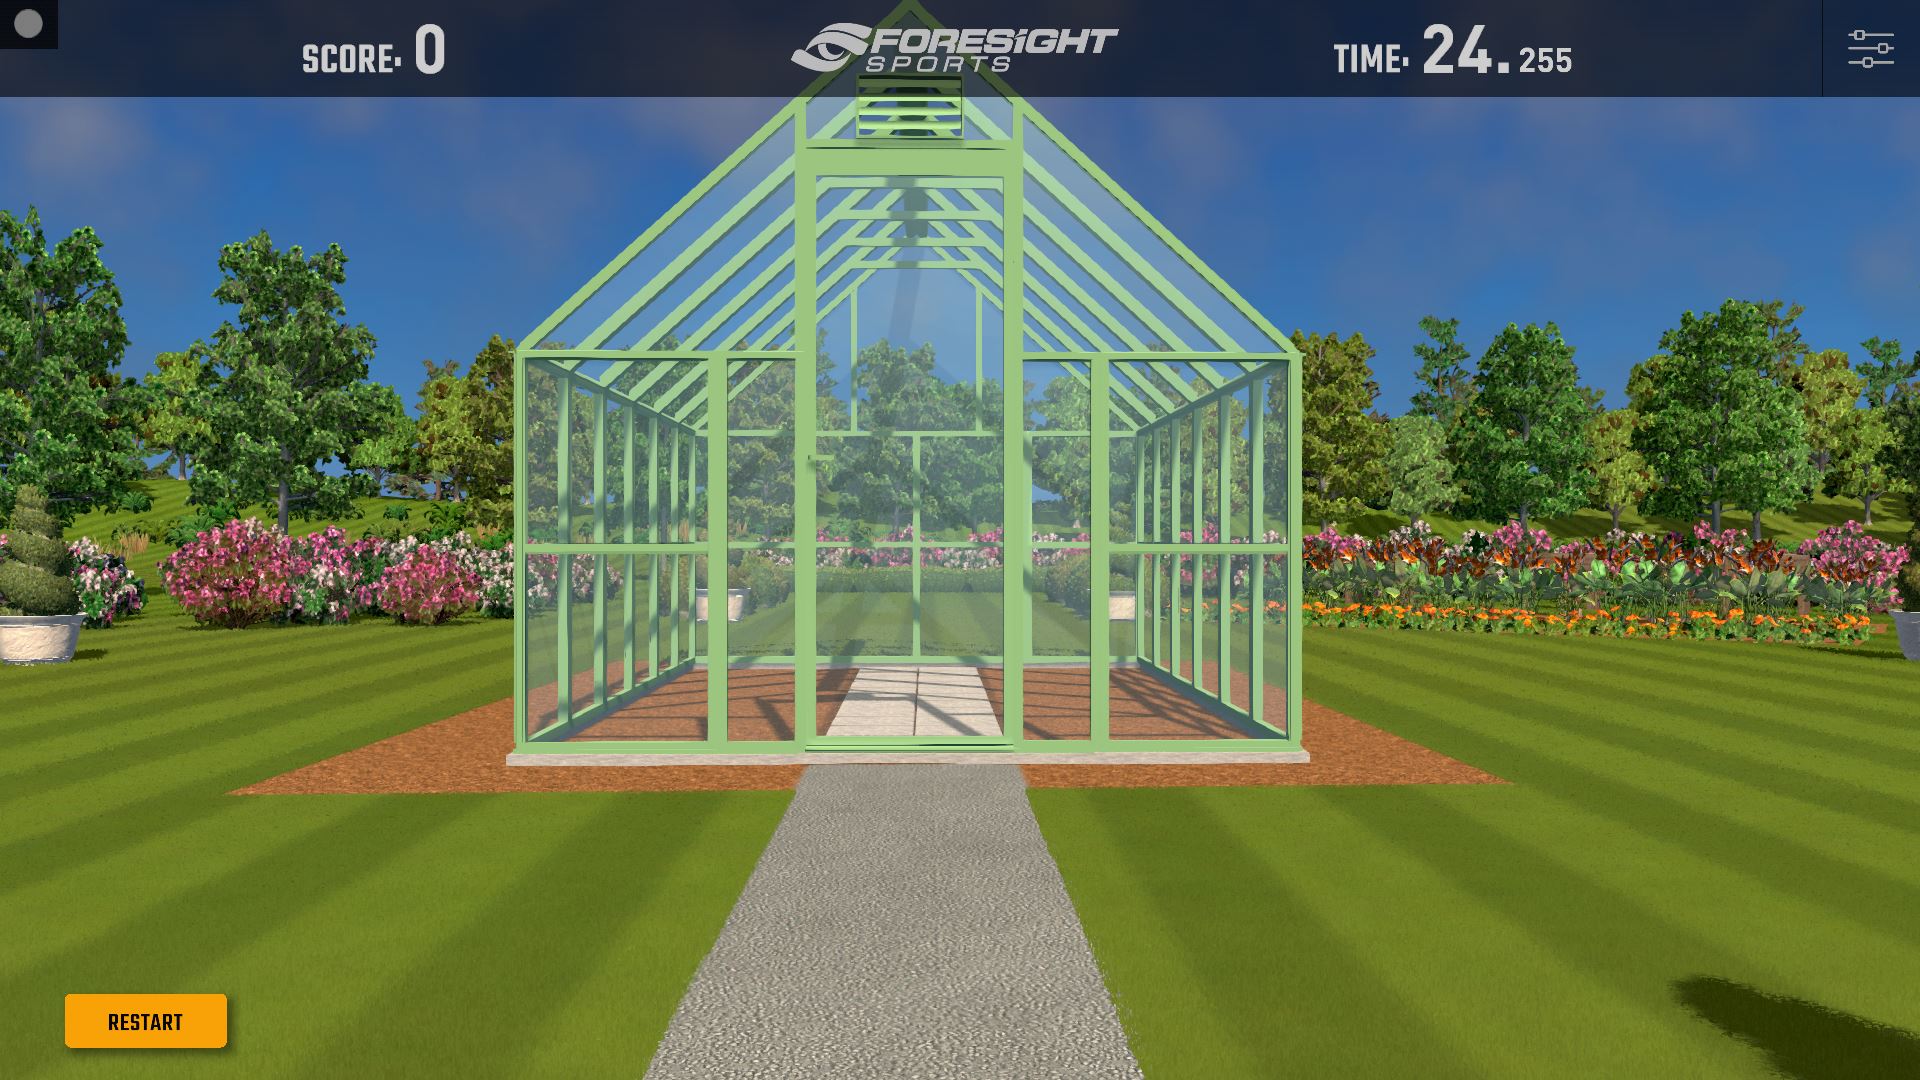
The objective of the glass break challenge is to score as many points as possible by smashing the panes of the Foresight Sports greenhouse. The challenge is split into four stages. Users have 30 seconds per stage to smash as many panes as possible. For each pane smashed, the user will receive 100 points.
The Glass Break challenge is accessed through the compete menu. Users can choose between golf and soccer modes.
Inside Six Feet
Users can access the Inside Six Feet user manual here.
-
Netplay
.
FSX 2020 contains a NetPlay feature which allows users to play online against each other. To select this feature, click the NetPlay icon in the main menu (top right). First-time users will then be prompted to create a username for FSX Live. Existing users can log in with their credentials.
Once logged in, users can choose a game mode before joining or hosting an online game.
Joining an Online Competition
Online Closest to the Pin and Long Drive competitions are accessible from the expandable Compete menu. Each course offers Closest-to-the-Pin competitions for all Par 3s and Long Drive competitions for all Par 4s and Par 5s, with unique leaderboards for each hole and tee combination.
Players entered into a competition are given 3 shots. Leaderboard rankings are determined from the best shot.
Note: Player must be logged into an FSX Live account to appear on the leaderboard.
-
-
Improve
-
Setup
Starting An Improve Session
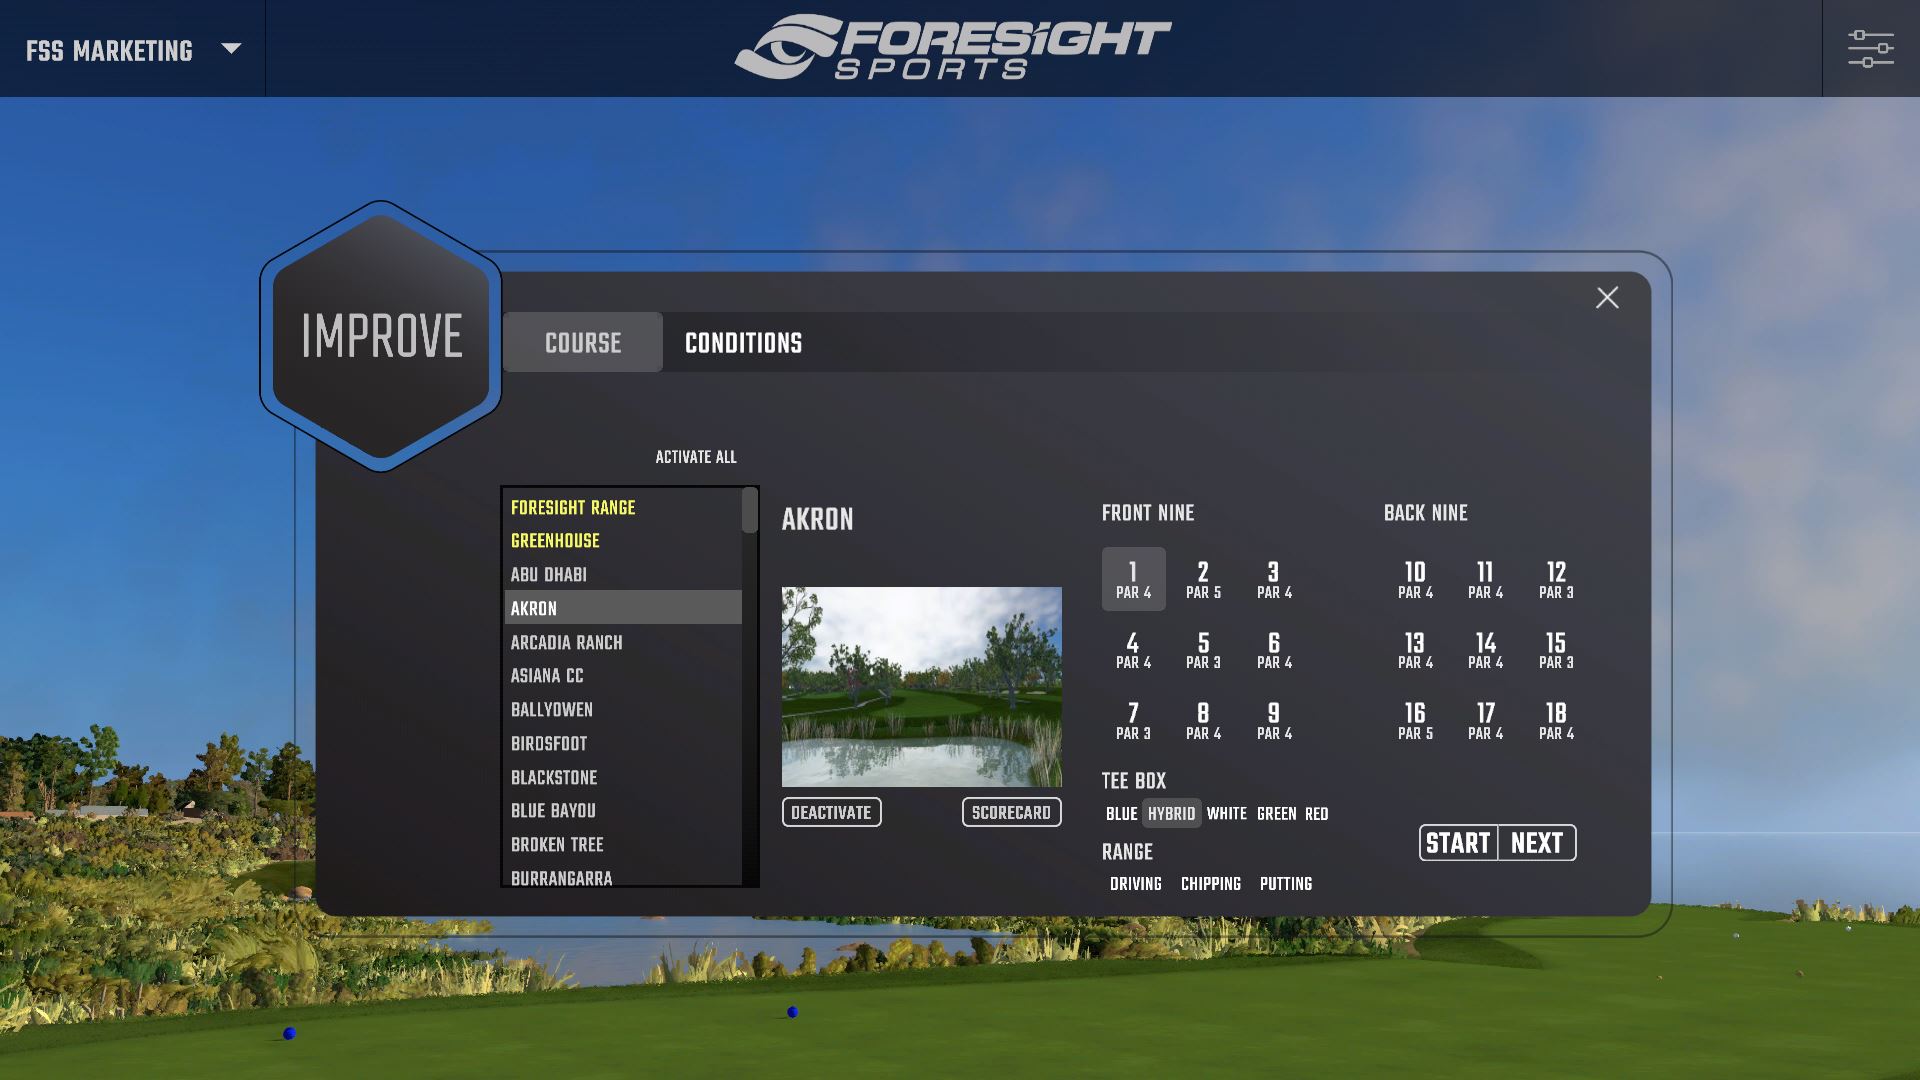
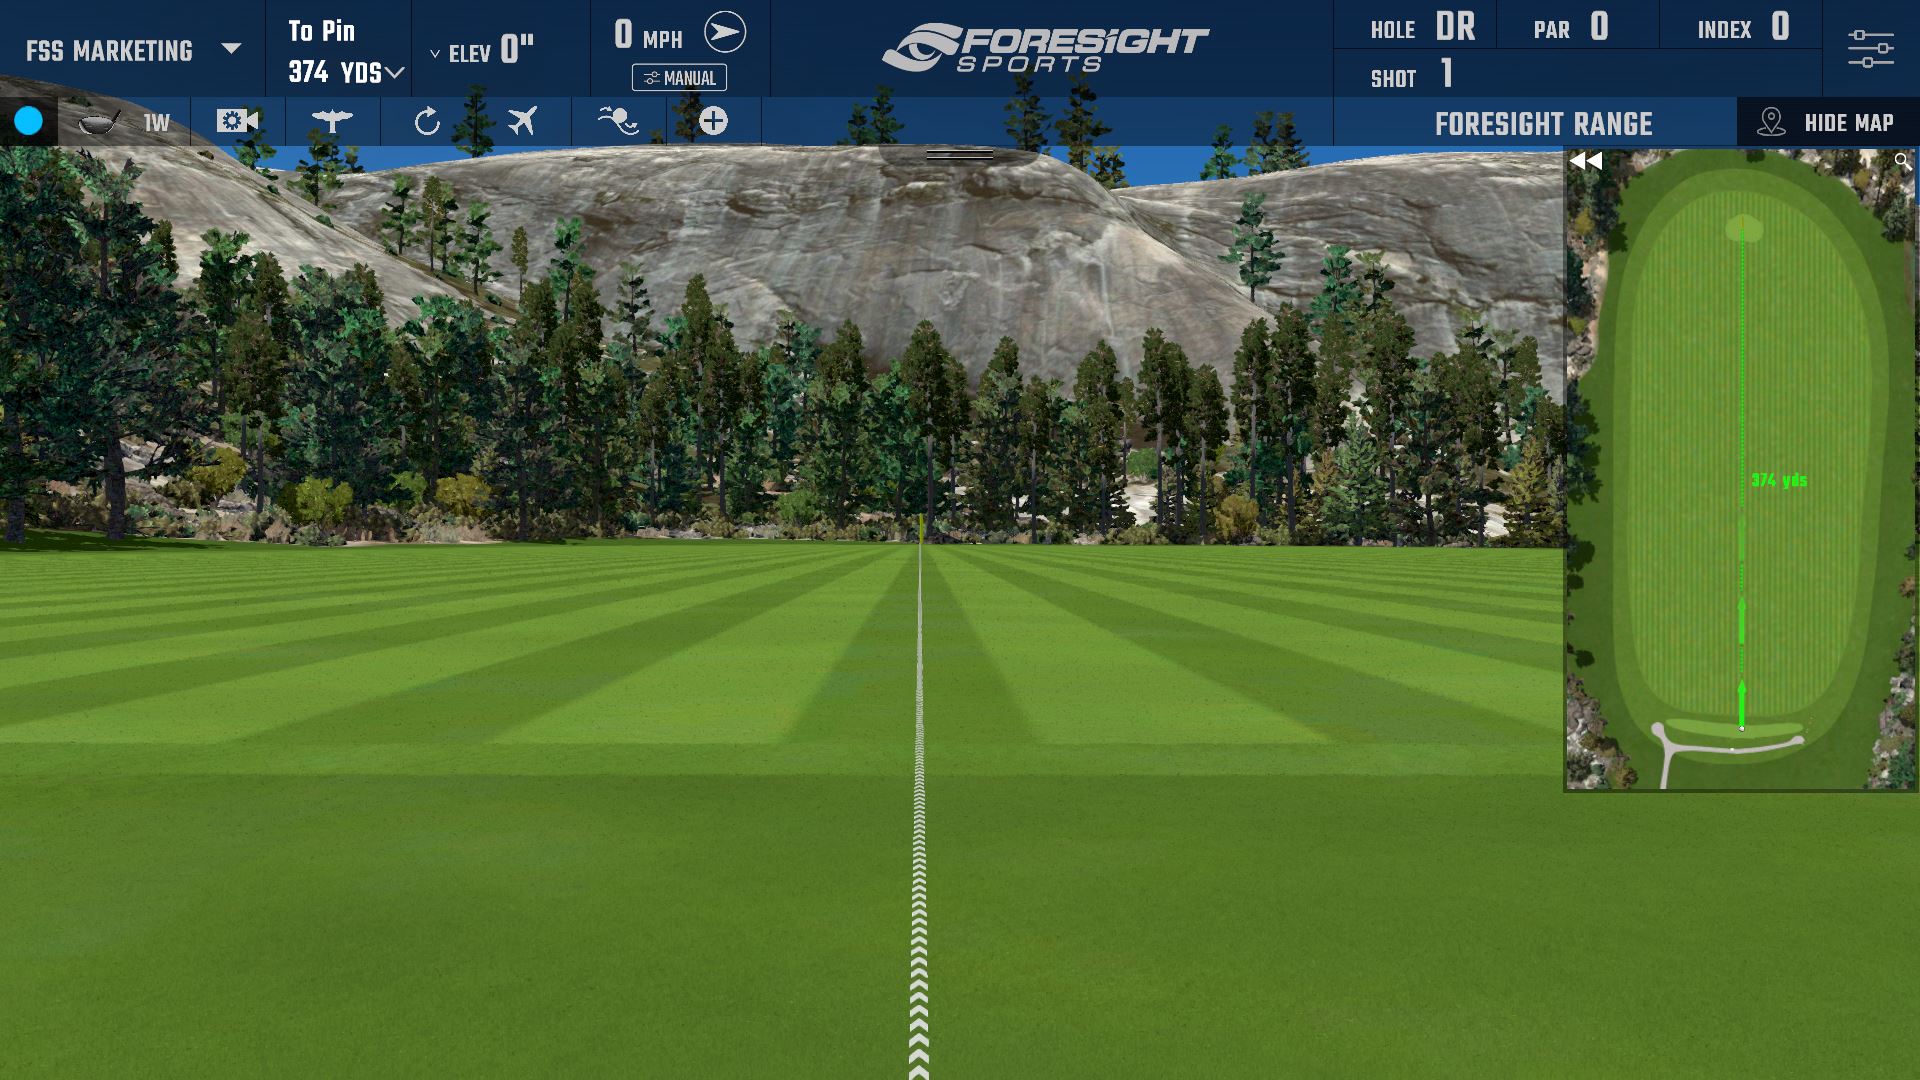
To start an Improve session, select the Improve icon on the main menu. The driving range is available by selecting the Foresight Range option. Players may also choose between a new session, their last played game, and a random play.
Driving, chipping, and putting modes are available in Improve as an alternative to the Foresight Range. To select them, select a course and hole and begin the game. Select the Dashboard tab in the top right hand corner of your screen. Enable the Hole icon in the shortcuts menu and click on the Hole icon to edit the mode. Here you may select Driving, Chipping, or Putting.
Changing Your Distance
Players may drop the golf ball anywhere on the golf course or driving range by hovering the mouse over the Mini Map and right-clicking. Alternatively, if playing on the driving range, players may change their distance settings by selecting the Distance drop-down menu located in the Heads-Up Display.
Selecting a Club
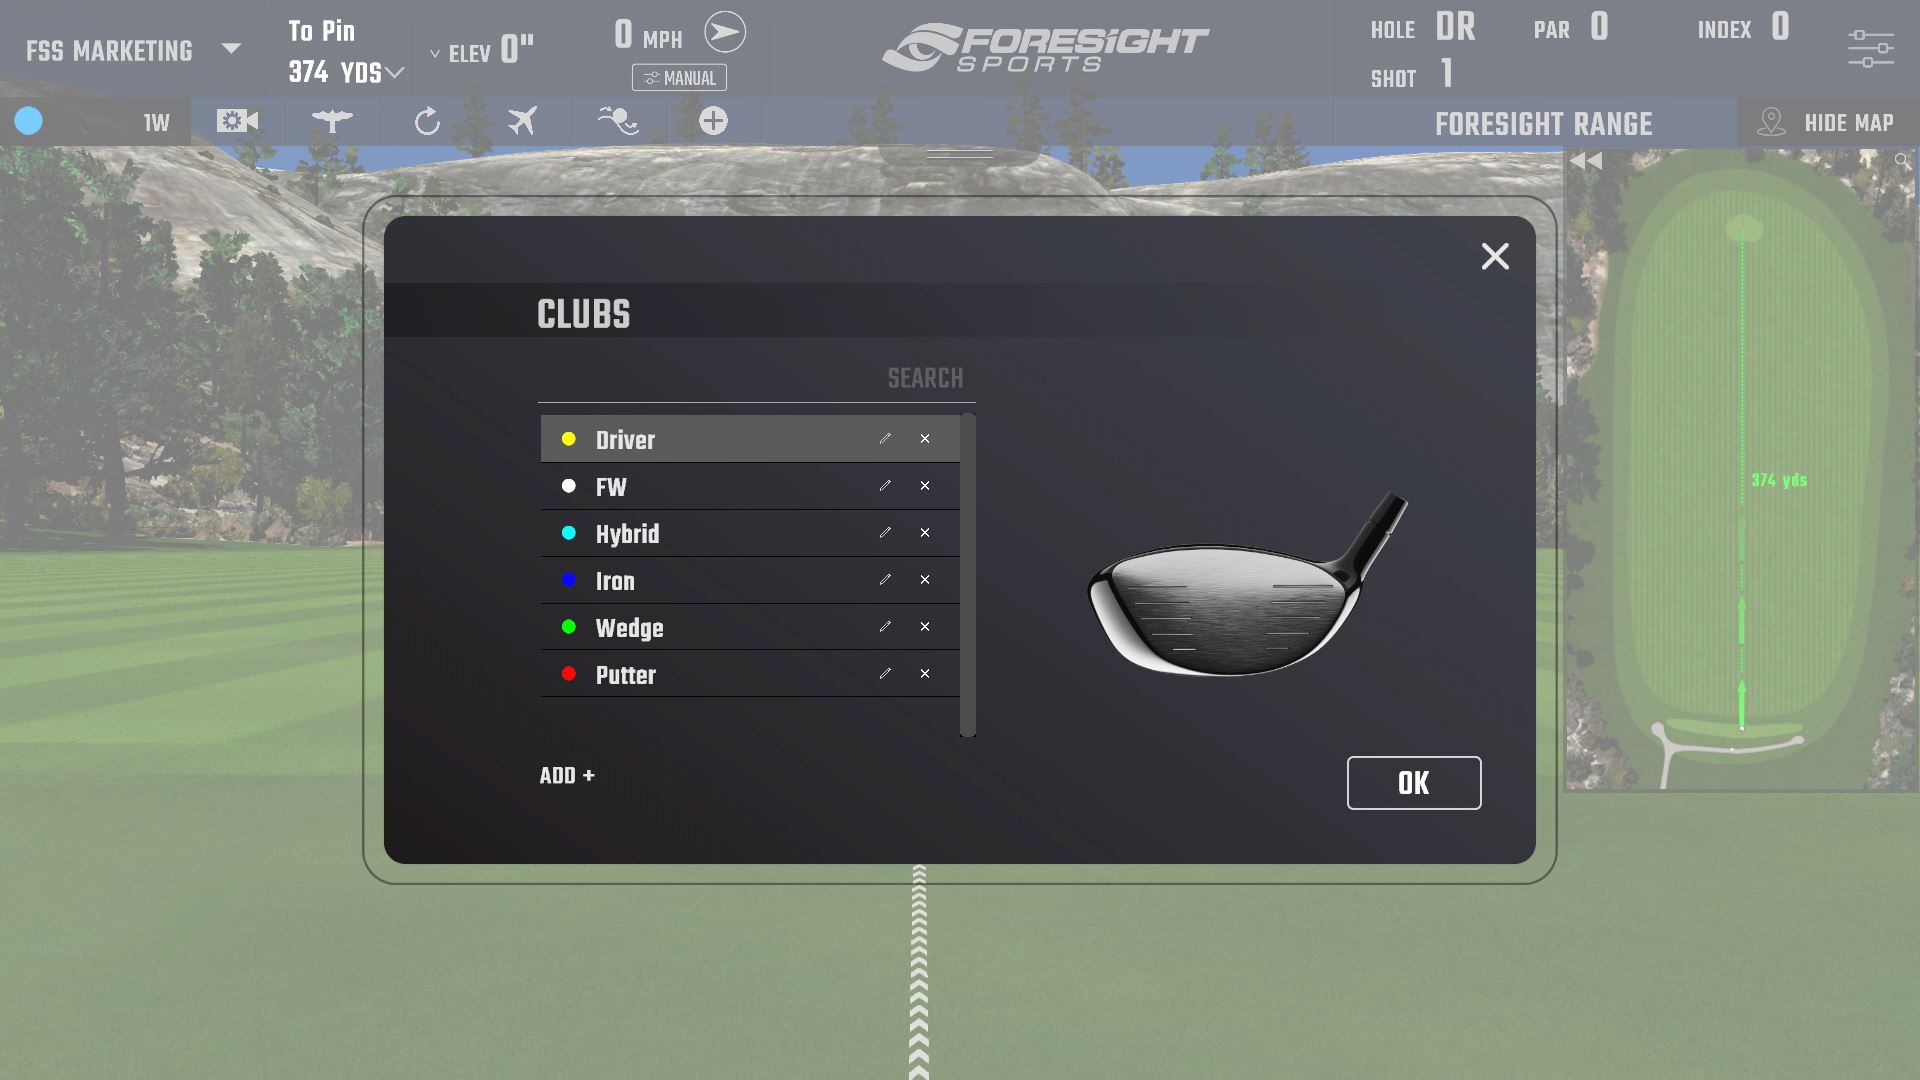
The player’s club choice may be changed at any time by clicking the Club icon located in the Heads-Up Display and bringing up the Select Club dialog. This dialog will show default clubs for each club type, as well as any additional clubs previously created by the player.
Creating and Editing a Club
To add, edit, or delete a club, select the Club option from the Heads-Up Display. To add a club, select the Add icon on the Add Club screen. You will be prompted to enter a club name, select club type, and change the ID color. Note: The club will only be added once you click the Save button.To edit or delete an existing club, select the club from the list and click the corresponding option at the bottom of the dialog.
-
Data Analysis
Data Analysis Screens
The data analysis screens can be accessed at any time by selecting the Analysis option from the expandable player menu located in the menu bar. They can also be accessed by pressing the I key on your keyboard. There are four analysis screens: video, ball, club, and shot table. You can switch between screens by selecting one of the four icons in the top left. You can also have the screens automatically trigger after every shot by enabling the Shot Data Timers from the On-Screen Data page in General Settings.
Analysis: Video
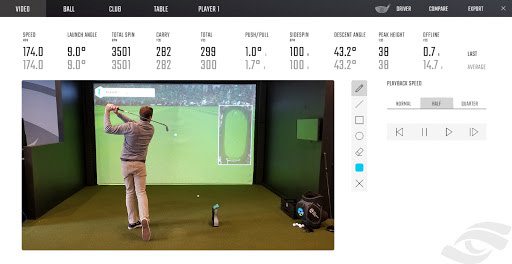
The video screen displays recorded video of the last shot (if a swing camera is connected), as well as the shot data. Video playback options are available on the right of the screen. Note: If no camera is connected, there will be no video displayed.
Analysis: Flight Data
The flight analysis screen displays all ball data for the last shot, the averages for the current club, and the shot trajectories (top and side) for the current club. This page can be saved to PDF or printed by selecting the PDF or printer icons at the top right of the screen.
Analysis: Club Data
The club analysis screen displays all club data for the last shot. You can toggle between last shot and average shot by selecting the Last or Avg buttons at the top left of the screen. Face measurement can be displayed either to target or to path by selecting the corresponding option in the middle of the screen. This page can be saved to PDF or printed by selecting the PDF or printer icons at the top right of the screen.
Analysis: Shot Table
The shot table displays all shots that have been taken during the current session. All shots are grouped by club. You can toggle between ball and club data at any time by selecting the corresponding option at the top left of the screen. You can view the video, ball, or club analysis screens from a previous shot by left-clicking on the corresponding line of data.
-
Compare
Deleting And Disabling Outliers
Outliers can be either disabled or deleted from the data set. To disable a shot, select the Disable option on the right side of the screen. Disabled shots will remain in the data set but will not factor into the averages. To delete a shot, select the Delete option on the right side of the screen. The shot will be completely removed from the data set. To delete all shots from the current session, select the Delete All option at the top right of the screen.
Analysis: Club Compare
You can compare multiple clubs in a session by selecting the Compare option at the top right of any of the analysis screens. Choose the clubs you wish to compare in the Select Clubs option at the top left of screen. You can compare up to 6 clubs at a time. You can toggle between ball and club data by selecting the corresponding option at the top of the screen. This page can be saved to PDF or printed by selecting the PDF or printer icons at the top right of the screen.
-
Export
Analysis: Export Data
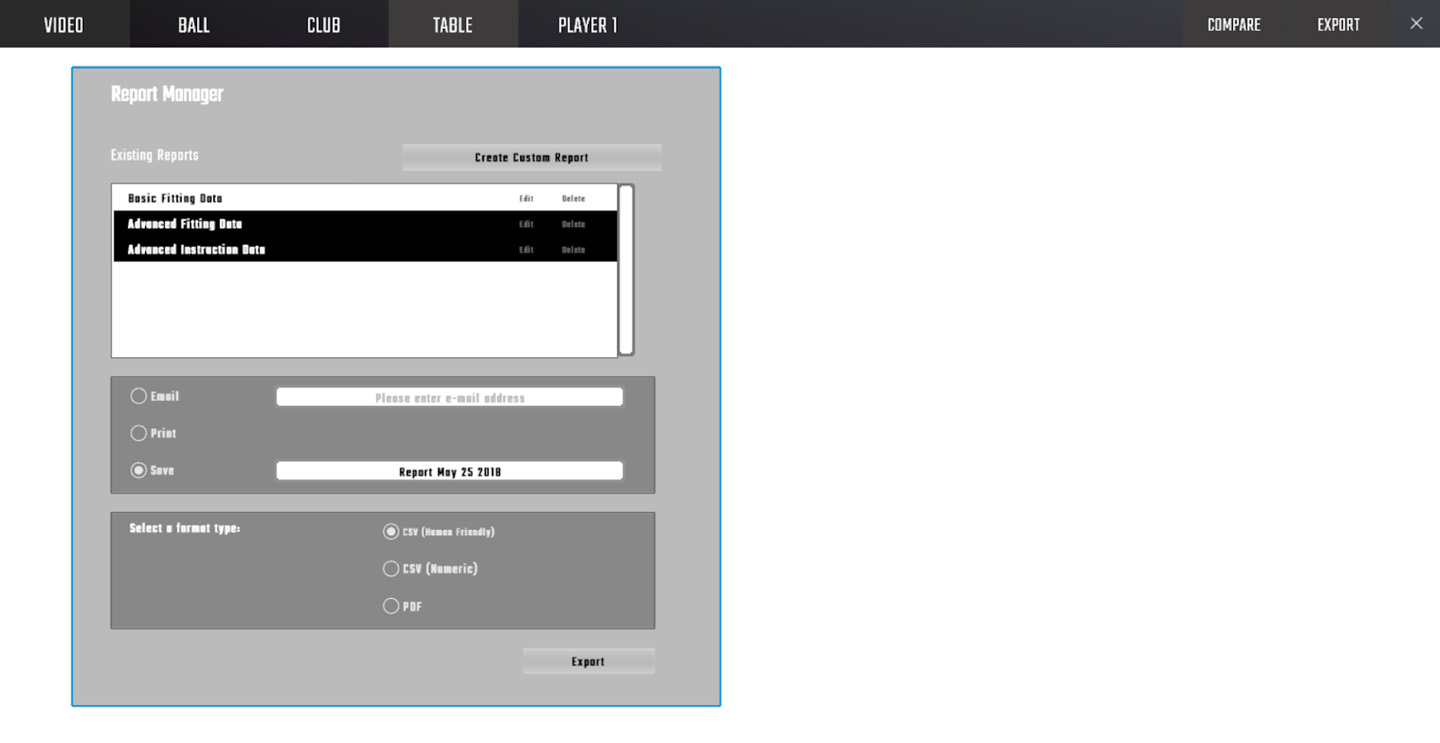
Data sets can be emailed, printed, or saved locally to the computer in CSV or PDF format through the Export option accessible from the top right of any of the analysis screens. You can customize the data being exported by selecting the Create Customer Report option, or use one of the existing reports. All custom reports created will be saved for future use.
-
Drawing Tool
Analysis: Swing Analysis Drawing Tool
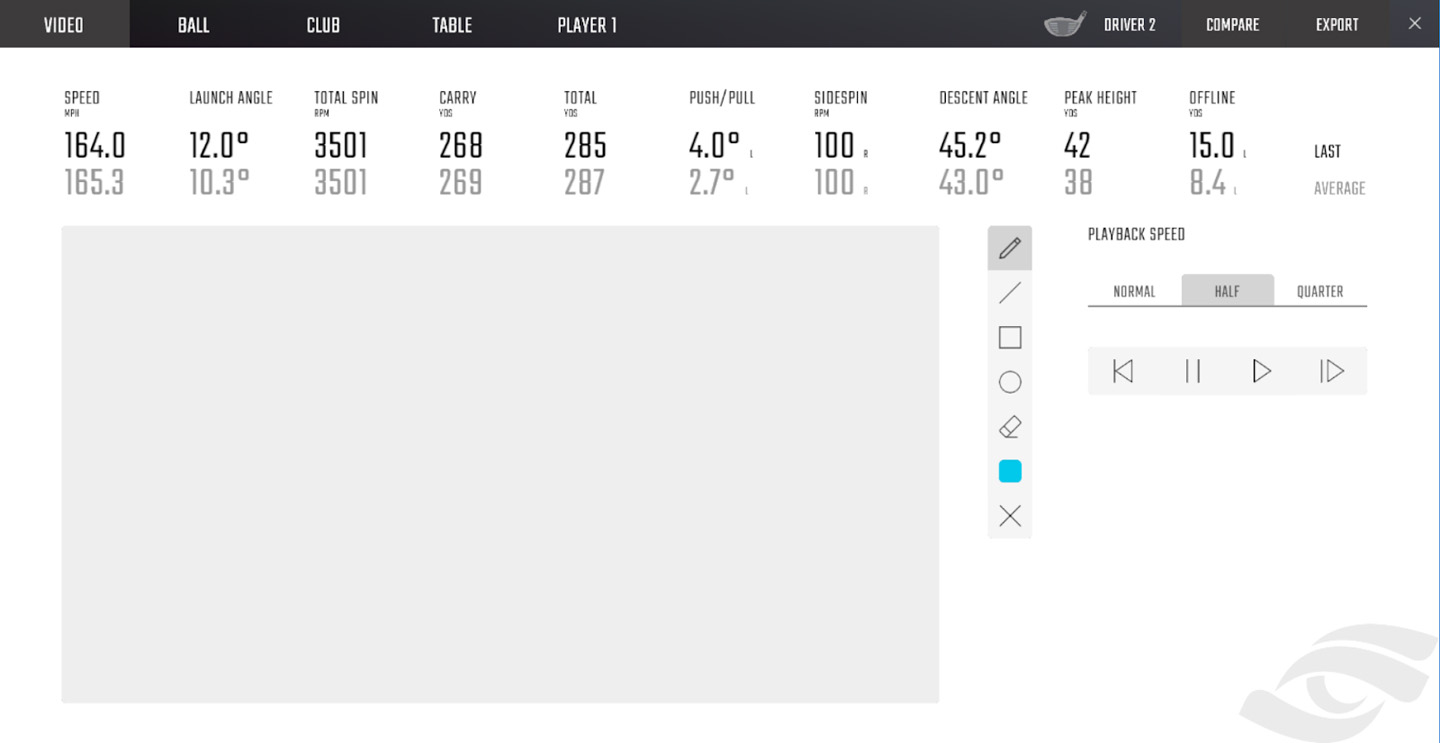
FSX 2020 features Swing Analysis Drawing Tools. To open this mode, click the Swing Analysis icon and select the tab furthest to the left.
In Swing Analysis Drawing mode, select playback speed. During playback, video can be rewound, paused, or fast-forwarded using the playback bar in the bottom-right corner.
Draw tool: Draw directly over swing video.
Line tool: Add line over swing video.
Square tool: Add square/rectangle over swing video.
Circle tool: Add circle/oval over swing video.
Highlighter tool: Highlight over select parts of swing video; will appear translucent over video.
Color select: Change the color of analysis marks in video.
Note: All drawings/lines/squares/circles/highlights are static and will not carry over into subsequent frames of swing analysis video. -
Know Your Numbers
Setup
Know your numbers is a gap testing mode that allows users to identify distances between each of their clubs.
To begin, select Know Your Numbers from within the Improve menu. Firstly, users should identify the clubs they would like to test. Select a club by clicking on the corresponding club icon. Alternatively, select a group of clubs by choosing all. Users may also select clubs from different club groupings. The number of clubs selected is indicated by the box to the right of the club selection screen. Next, users should choose their club testing order and ball type. Launch the game by selecting start test.
Note: It is recommended to test clubs in sequence. For example we recomend testing 7I, 8I, 9I and PW instead of 8I, 4I, PW.
In-Game
Users must hit a minimum of 3 shots with each club to progress to the next club. Choose the select shots icon to select which shots are used for gap testing. A minimum of 3 shots must be selected for each club. With their representative shots selected, users should select the go to next club icon to continue testing.
Note: If 10 shots have been hit and the user would like to continue testing with the same club, they can select the keep hitting option and choose shots to discard.
Report Screen
Once completed, users will be prompted to go to the view report screen. To view dispersion, hover over the club icons. The shot data can be saved to a local PC, printed or emailed. To finish, save, print or email the data and select the exit icon.
Note: The exit icon will not be available until the shots are saved via one of the three methods. If users wish to exit without saving their shots, they should select the X icon (top right).
-
-
Settings
-
Graphic Settings
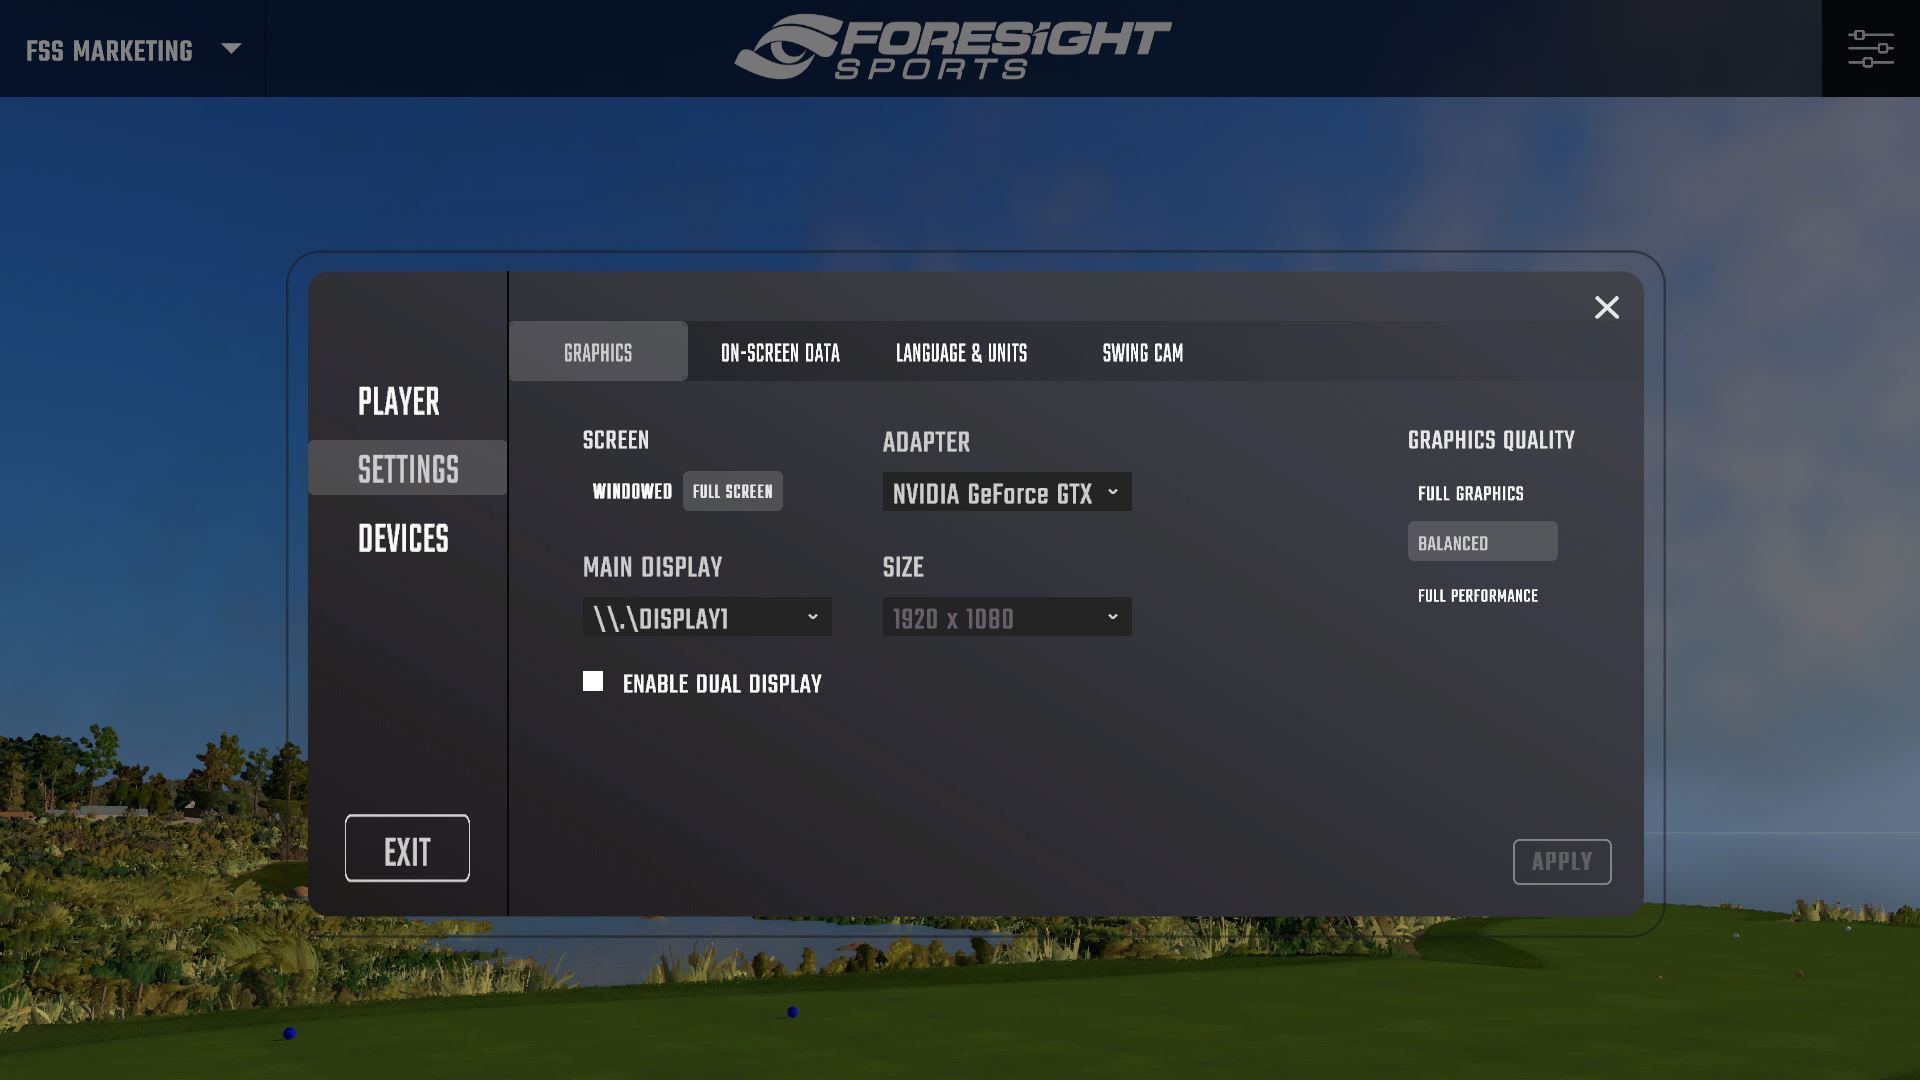
The graphic settings can be accessed at any time through the menu icon at the top right hand corner of the screen. You can change the screen setting, graphic performance setting, video card adapter, display output, and screen resolution. You must hit Apply before leaving the screen in order for any changes to take effect.
Performance Settings
There are 3 different performance settings designed to optimize FSX 2020:
Full Graphics: Graphics are delivered at their full potential. Recommended only for high-performance computers.
Balanced: Graphics and performance are balanced to optimize the FSX 2020 experience.
Full Performance: Graphics are significantly reduced in order to boost performance. Recommended for lower-performance computers.
For a full list of the computer specifications required to run FSX 2020, please contact support@foresightsports.com. -
General Settings
General Settings
Language and Units: Allows player to change language and select desired units of measure.
Audio: The volume of course sounds and commentary can be adjusted. Commentary can be enabled/disabled.
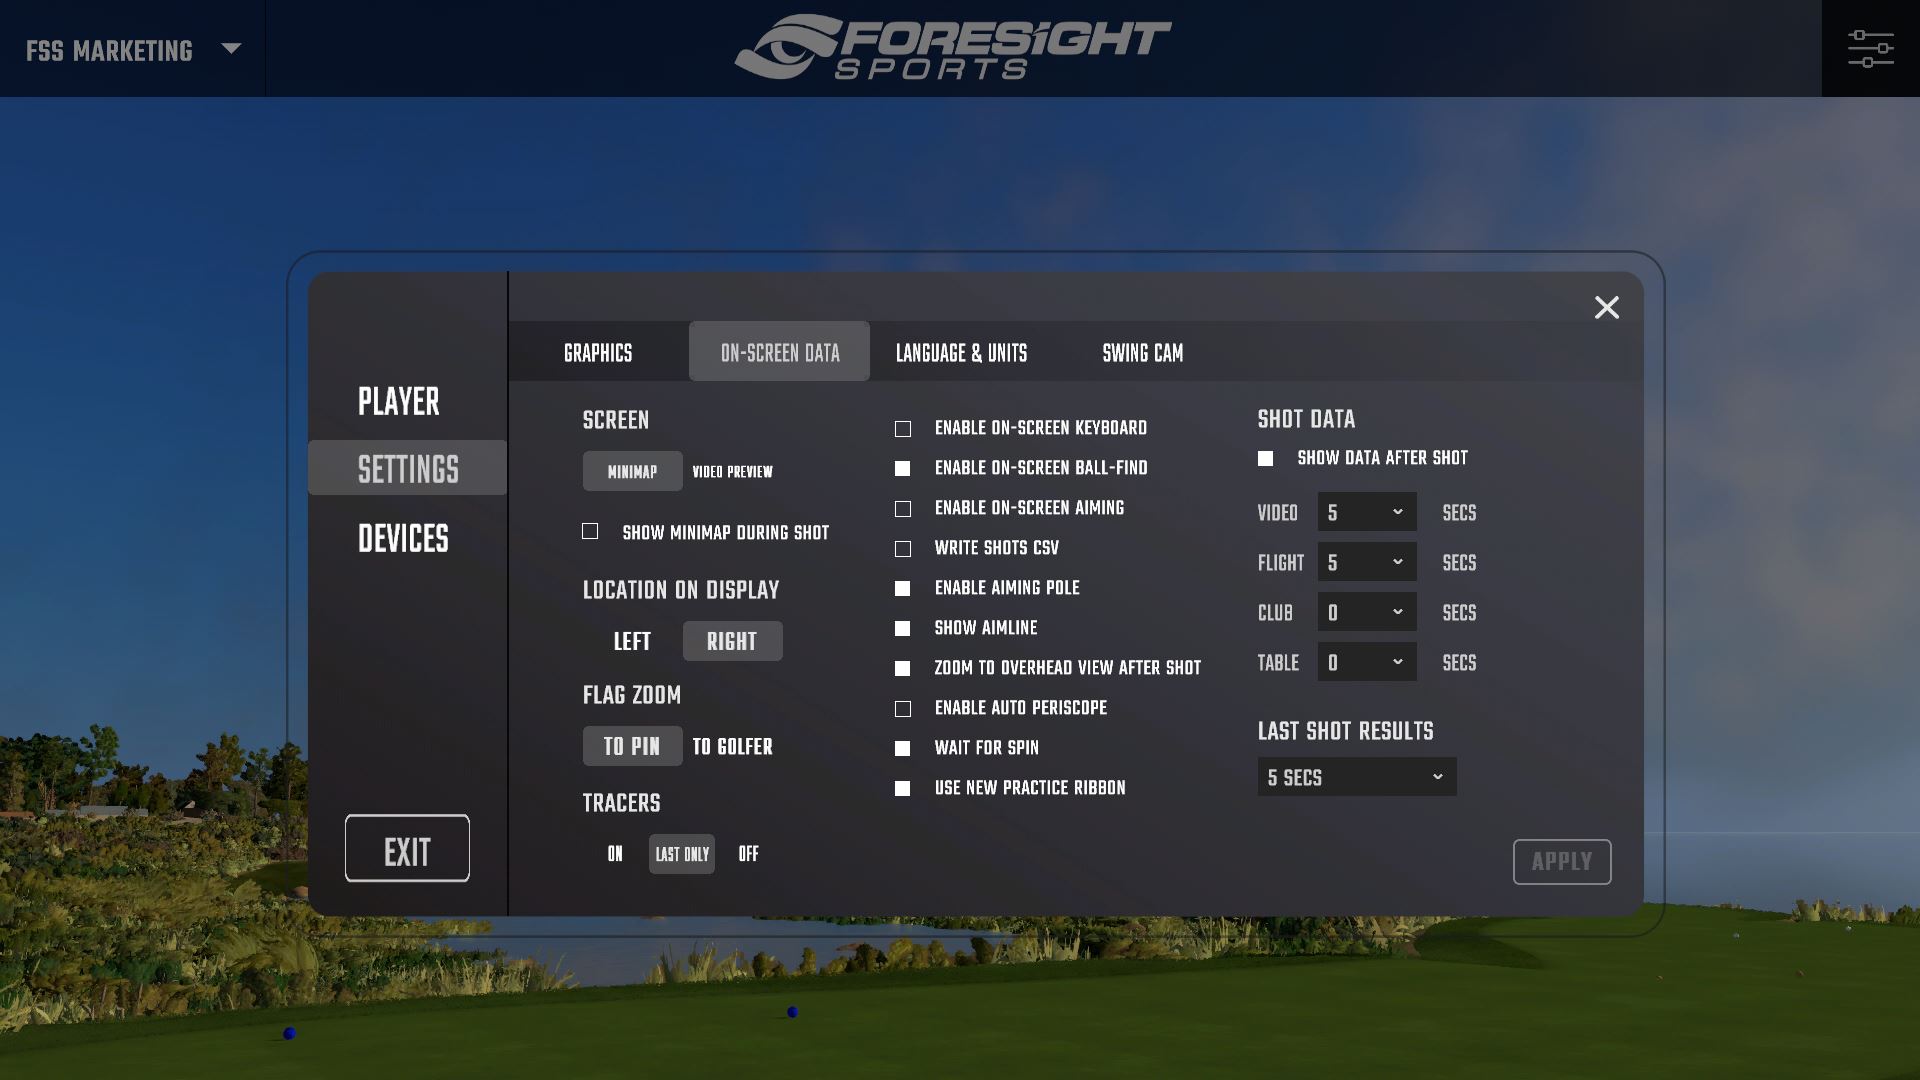
On-Screen Data:
Screen: Choose to view Mini Map or a video preview of swing camera.
Indicator Layout: Choose to have the Mini Map or the video preview on the left or right side of the screen.
Tracers: Enable or disable ball tracers during shot. Select Last Only to see the tracer of the last shot hit.
Zoom to Overhead View after Shot: Enable or disable camera pan to overhead view once shot is completed. Shows carry distance, total distance, and distance offline to target.
Wait for Spin: FSX 2020 will wait until spin is calculated and received from the device before showing the shot. If wait for spin is disabled, FSX 2020 will show the shot immediately and adjust shot shape once spin is received.
Note: Disabling Wait for Spin will result in limited flight camera options. We recommend using the software with Wait for Spin selected.
Enable On-Screen Keyboard: When enabled, a keyboard will appear in FSX 2020 if a text field is selected.
Enable On-Screen Ball Find: Ball find displayed on the device screen will also display on-screen in the software. Note: This option is important when using devices that do not have a screen.
On-Screen Data:
Enable Video Preview: Only applicable if using a camera with FSX 2020. Shows a small preview window of the live camera feed in-game.
Write Shots CSV: When enabled, FSX 2020 will write all shot data to the “shots.CSV” file located in the System folder under the Foresight Sports Experience directory on your computer.
Enable Aiming Pole: When enabled, a large pole is visible in-game to assist with aim.
Enable Touchscreen Aiming: When enabled, allows user to adjust aim via touchscreen.
Note: Show Flag feature now has two modes: To Golfer and To Pin.Bluetooth Settings
To connect the device to FSX 2020 via Bluetooth, the device must first be paired with the computer. From the Windows desktop, access Devices and Printers via the Control Panel. In the top left corner, select “Add a Device.” Select the device from the list provided to pair. Once pairing is successful, return to FSX 2020.
From the FSX 2020 main menu, select the Settings icon in the top right. Choose the Devices tab and connect your device in available the devices list.
Camera Settings
The camera settings can be accessed at any time through the menu bar or by pressing the key command Ctrl+Shft+A while in game. The camera used by FSX 2020 can be selected by clicking the drop-down at the top of the screen. Once a camera has been selected, live feed from the camera as well as editable camera settings will appear on-screen. All settings can be adjusted by clicking the +/- buttons, or by clicking directly in the field and typing a value.
Dual Monitor Support
.png)
To enable Dual Monitor Support, please ensure multiple displays are enabled on your Windows desktop. Right click on your desktop and select Display Settings. Navigate to the Multiple Displays section in the displays tab and select Extend Display.
In-game, click the Player Dashboard (top right), choose Settings and click on Dual Display. Check the Dual Display box and select your second display. Check the boxes for which features you want displayed on either or both monitors, then click Apply.
-
-
Glossary
-
Introduction to Ball Flight Data
The launch condition is described by a combination of the following measured ball-launch parameters:
Ball Velocity
Total Spin
Vertical Launch Angle
Azimuth
Spin Tilt Axis
The spin-tilt axis is the axis the golf ball rotates around to define shot curvature and lift. When the spin-tilt axis is oriented to the left (looking down range), the ball’s trajectory will move from right to left, and vice versa.
Ball Velocity
Ball velocity (also called ball speed) is measured at the point of separation and can be displayed in either miles per hour, kilometers per hour, or meters per second.
Vertical Launch Angle
Vertical launch angle is the angle, measured in degrees, between the ground plane and the ball launch vector.
Azimuth
(Also known as side angle or deviation angle) The initial horizontal angle relative to the target line; the azimuth, combined with side spin, will determine the fi nal ball position down range relative to the target-line.
Back and Side Spin
Backspin is the rotation (per minute) of the ball given a completely neutral spin tilt axis, derived from total spin. Side spin is the rotation (per minute) of the ball around its vertical axis, derived from spin tilt axis.
Total Spin
Total spin is the rotations (per minute) of the golf ball around the spin axis.
Carry
The total distance of flight produced by initial launch condition.
Total Distance
The combined ball flight with bounce and roll.
Peak Height
The apex of the trajectory measured from the ground plane.
Descent Angle
The angle of the trajectory measured from the apex to the ground.
Offline
The end position distance to right or left, measured from the target-line.
-
Introduction to Club Head Data
Head measurement
Measurement of the delivery of the club head, described by path, face plane, velocity, and impact location of the golf ball.
Club Head Speed
Club head speed is the instantaneous speed of the club face center along the club head path at moment of impact displayed in mph, m/s, or km/h.
Efficiency
The ratio between club head and golf ball velocities to determine the quality of the ball strike. Described as ball speed divided by head speed = ratio, efficiency or smash factor.
Angle of Attack**
Angle of attack is a value measured in degrees that tells us how much up (or down) the club head is traveling in the vertical plane in relation to the ground plane.
Club Path
Club path is the measured angle (in degrees) to the left or right of the target line that the club head face center is traveling at the moment of impact.
Delivered Face Angle
Delivered face angle describes the club face’s deviation (in degrees) from square to the target line at impact. A closed face is angled toward the golfer; an open face, angled away.
Impact Loft**Impact loft is the inclination of the face plane, measured in degrees, relative to the ground plane at the moment of impact.
Delivered Lie Angle
Delivered lie angle is the club shaft’s inclination in relation to the ground plane. Traditionally, lie angle has been measured using a lie board to leave a mark on the sole of the club post-impact.
Impact Point
Impact point is the point on the club cace that first touches the ball. Impact point will be reported via two separate measurements displayed in millimeters (mm) and presented relative to the vertical and horizontal centers.
Closure Rate
Closure rate is an instantaneous measurement taken just before the ball is impacted by the club, displayed in either degrees per second (dps) or revolutions per minute (rpm).
-

.JPG)
.JPG)
.JPG)
.JPG)
.JPG)
.JPG)
.JPG)
.JPG)
.JPG)
.JPG)
.JPG)